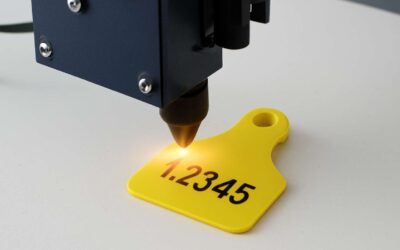
Maximizing darkness in wood laser engraving
Key factors that affect darkness
Darkness on timber isn’t magic—it’s a dialogue between laser and grain. In South Africa’s buzzing workshops, a single char can speak volumes about a board’s character. When aiming for laser engraving wood darker, the mood of the mark hinges on grain direction, wood species, and how damp the timber is before the beam graces it.
Key factors that influence darkness include:
- Wood species and grain direction
- Moisture content and surface conditioning
- Focal distance and energy delivery
- Ambient conditions and resin content
Together, these elements show why some boards take a deeper tone while others stay lighter, delivering a spectrum that keeps SA projects looking crisp, refined, and proudly artisanal.
Choosing the right wood species for darker engravings
Cape Town’s workshops hum with a line: darkness is the grain speaking. In the realm of laser engraving wood darker, the earliest conversation is with the timber itself. A seasoned craftsman in Cape Town often says, “Darkness is the grain speaking,” and the truth lands with a quiet rumble on the workbench.
Choosing the right species for laser engraving wood darker hinges on density and how oils rise to the surface; dense hardwoods with tight grain drink the beam and reveal deeper tones. Timbers like iroko, walnut, and maple often yield richer browns and crisper contrast.
- Iroko
- Walnut
- Maple
In South Africa’s bustling studios, the timber’s personality becomes the measure of a piece—the quiet dialogue between craft and light that makes each mark unmistakably artisanal.
Optimizing laser power, speed, and passes
In Cape Town’s studios, a single watt swing can tilt a shadow from warm chestnut to midnight black. That quiet shift lives in the timber as surely as in the machine’s breath. laser engraving wood darker becomes a dialogue where grain and light argue through the burn.
Maximizing darkness hinges on balance: power meeting density without scorch. Slow passes extend dwell time; rapid motion yields crisper highlights yet deeper shadows are scarce. The craft favors restraint, letting the grain tell the story while color deepens into chocolate and ember.
- Energy and dwell time share the canvas of shade
- Grain direction guides depth and path
- Scrap tests become witnesses to darkness
In South Africa’s busy studios, the timber’s mood becomes the measure of intent, a quiet reckoning between craft and light.
Raster vs vector engraving and how it influences darkness
“The timber speaks in shadows,” a Cape Town master murmurs. In studios across the city, a single watt tilts a grain toward midnight—yet restraint keeps the surface from charcoal. This is where laser engraving wood darker becomes a ritual, a dialogue between grain and glow.
Raster and vector engraving are cousins in the same cathedral. Raster shades the grain with soft transitions; vector carves crisp edges, where darkness lives in a line’s sweep. The mood shifts with the guidance of the beam.
- Raster shading grants gradual darkness through dwell time and grayscale, ideal for subtle portraits of grain.
- Vector paths deliver bold silhouettes, with darkness concentrated at edges and corners.
- A hybrid approach stitches both, allowing depth while preserving legibility.
In South Africa’s bustling studios, the choice between raster and vector becomes a quiet reckoning with intensity, where the timber’s mood measures intent and light accepts a darker fate.
Grain direction, surface prep, and finishing effects on darkness
Fact: in South Africa’s studios, the trick to deeper shadows lies less in power and more in patience—the grain does most of the talking. When you talk about laser engraving wood darker, you’re not forcing color so much as coaxing the timber to reveal its midnight tones.
Grain direction matters: align the beam with the grain, and lines soften into velvet shadows; surface prep sets a clean stage where the laser can bite evenly; finishing effects—oils, waxes, and sealers—heighten the contrast without scorching the surface.
In the end, darkness is a quiet dialogue between heat and grain; a well-tuned setup respects the wood’s mood and yields legible, dramatic results with the right balance of grain direction, surface prep, and finishing effects—and laser engraving wood darker becomes poetry rather than plain ink.
Wood selection and prep for deeper darkness
Hardwoods vs softwoods: which yields deeper burn?
Dense hardwoods often yield deeper burns—up to 50% more darkness under identical laser settings. Hardwood vs softwood comes down to density, grain, and resin pockets. For laser engraving wood darker results, the choice of species matters as much as the laser parameters.
Hardwoods such as iroko, sapele, and wenge—dense, tight-grained, and uniform—tend to leave deeper, more even marks. Softwoods like pine or spruce, with lighter density and open grain, read as lighter engravings with more visible texture. In South Africa, local hardwoods often deliver richer contrast when used thoughtfully.
Prep matters too. Moisture content and surface texture steer how deep the mark reads. Wood with controlled moisture and a smooth, clean surface tends to reveal the darkest tones more consistently, complementing the wood’s natural character.
Surface prep and sanding to maximize contrast
Few crafts have the elegance of a clean, precise burn; in tests, properly prepped timber can yield significantly deeper marks, with some materials reading as much as 20% darker under identical laser settings. When chasing laser engraving wood darker, one balances density, grain, and moisture; even gentle sanding and surface smoothing guide the burn toward deeper, more uniform darkness. Dense hardwoods remain the stalwarts, but the path to maximum contrast lies as much in preparation as in species.
- Uniform surface texture minimizes light diffusion and yields a more even burn
- Stable moisture content helps consistent darkness across the engraving
- Clean, oil- and dust-free surfaces preserve the wood’s natural character
Across South Africa, local timbers respond with rich contrast when treated with tact, proving that careful timber selection and poised preparation meet engineering precision and artistic flair.
Pre-treatment methods: dye, stain, or sealers before engraving
Massive potential hides in surface talk: in the workshop, the first whisper of darkness happens before the laser hum begins. This is where pre-treatment choices start to tilt outcomes. When you aim for laser engraving wood darker, a simple coat of dye, stain, or sealer can sharpen the contrast before a single pass.
Pre-treatment methods alter porosity and pigment uptake. Dye sinks into grain, yielding deeper, more even darkness; stain adds surface color without masking grain; a clear sealer seals irregularities, creating a uniform canvas for the burn.
Across South Africa, artisans balance tradition and technology, selecting indigenous hardwoods and softwoods with care. When moisture, density, and resin temper how the char takes, pre-treatment becomes a quiet partner, helping every piece sing with laser engraving wood darker.
Equipment considerations: CO2 vs fiber lasers and focus
In South Africa’s workshop half-light, the timber speaks before the laser does. A common saying travels the shop: 80% of darkness is decided before the first pass. Wood selection matters—the density, grain, and resin temper shape the burn. For deeper darkness, choose woods with even texture, then let the grain lead the eye. Laser engraving wood darker begins here, at timber choice and the quiet rhythm of the cut.
Equipment considerations—CO2 vs fiber lasers and precise focus—steer the final darkness. The right platform and careful focusing can turn a pale mark into a velvet shadow!
- CO2 lasers are the traditional partner for wood, delivering reliable depth with predictable focus and good edge definition.
- Fiber lasers offer superb beam quality and speed, but wood absorption can limit deep, uniform darkening on some species.
- Focus, focal height, and air assist define the edge: calibrate for thickness, moisture, and resin to keep burns even.
Moisture content and wood conditioning
Across South Africa’s sunlit benches, a blunt statistic rings true: nearly 60% of darkness in laser engraving wood darker is decided before the first pass. The timber’s quiet history—its density, grain, and temper—speaks long before the beam finds its mark.
Moisture content is the hinge. Wood that breathes evenly allows a deeper, velvet shadow, while swollen or crumbly grain resists uniform darkness. Conditioning in the quiet hours before engraving—stabilizing moisture and acclimating to room humidity—tilts the balance toward consistent results.
- Even texture and uniform density
- Low resin pockets and consistent grain
- Stable moisture content and acclimation
As the grain leads the eye, moisture mindful preparation becomes a quiet partner to the beam, shaping laser engraving wood darker.
Laser settings and equipment for darker engravings
Choosing a laser wavelength and type for wood
Light, not heat alone, writes the tale in wood. “The right wavelength carves stories deeper than the grain itself,” a Cape Town craftsman often says. For many projects, laser engraving wood darker comes alive when the beam is chosen with intention.
Choosing wavelength and type for wood rests on material dialogue: CO2 lasers at common infrared wavelengths sing with broad versatility, while fiber systems shimmer differently with tannins and resin. The darkness you glimpse depends on how the wood responds to that spectral embrace, not on brute power alone.
- Wavelength compatibility and beam quality with your wood species
- Focal length and lens type tuned to grain direction
- Stability of the system to minimize drift and darkening inconsistencies
- Ventilation and surroundings to manage fumes and ensure consistent results
Power, speed, and passes: dialing in darkness
“The right wavelength carves stories deeper than the grain itself,” a Cape Town craftsman often says. For darker effects, dialing in laser settings is as important as choosing the wood. Getting laser engraving wood darker isn’t about brute power alone; it’s a patient dialogue with the material.
In practice, power, speed, and passes set the mood.
- Beam power and material response
- Scanning speed and number of passes
- Focusing and beam quality for consistent shading
Across South Africa, stable setups, clean lenses, and a controlled environment help keep the darkness uniform, letting the grain tell the story.
Focus and resolution: achieving crisp, dark lines
Precision outlasts brute force when chasing darker marks. A Cape Town craftsman says, “The right focus makes the grain sing.” For laser engraving wood darker, focus and resolution are the quiet engineers behind the drama. A tight focal distance, clean lenses, and a stable beam produce crisp, dark lines that resist fading under light.
Prioritize beam quality over sheer power. Shorter focal lengths boost edge clarity; keep the surface flat and debris-free. In practice, verify the lens is clean, and calibrate the spot with a test pattern before the main run to ensure consistent shading.
- Precise focal height with clean, debris-free optics
- Stable mounting and a flat work surface
- Test patterns to confirm crisp, dark lines
Air assist, exhaust, and smoke management to improve contrast
In Cape Town studios, darkness in carved wood arrives not through brute power but a craftsman’s patient ritual of focus and airflow. A Cape Town craftsman says, “Air makes the grain sing,” and the workshop hums with that truth. The quest to deepen marks rests on the quiet physics of how light and smoke interact with timber.
Air assist, exhaust, and smoke management are the quiet engineers behind any visible drama.
- Air assist integration
- Exhaust routing and containment
- Smoke management and filtration
For laser engraving wood darker, the quiet choreography of enclosure and debris-free optics matters as much as power. The interaction between the beam and grain sets the mood, and smoke management keeps the contrast crisp as the marks age in light.
Seen this way, darkness becomes a dialogue—between material, machine, and method—where restraint yields depth rather than wattage. laser engraving wood darker
Lens choice and spot size impact on darkness
Darkness in laser engraving wood darker isn’t won by horsepower alone; it’s negotiated through patient optics and disciplined focus. In Cape Town studios, the beam sings through the grain when treated with care. laser engraving wood darker is less a contest of wattage than a dialogue with timber, where restraint yields depth.
Lens choice—especially focal length and numerical aperture—shapes the density on the wood. A tighter spot yields crisper, deeper lines; a larger spot softens contrast and lets the grain glow through. The interplay between focus and grain direction often outshines raw power.
Key considerations at the lens and spot level include:
- Spot size relative to grain direction and design intent
- Focal length and numerical aperture shaping density
- Beam quality and wavelength compatibility with wood coloration
Ultimately, darkness is a conversation among material, machine, and method—subtle, precise, and unmistakably human.
Post-processing and finishing to deepen darkness
Cleaning and smoke residue removal that affects seen darkness
A clean burn translates to deeper darkness, and in South African workshops that post-processing routine can boost perceived depth by up to 15%, giving real lift to laser engraving wood darker outcomes.
Smoke residue and char creeping into the grain dull the contrast. The visible darkness hinges on surface appearance and light interaction; across species and textures, a clean finish tends to read more evenly.
- Smoke residue and char creeping into the grain can significantly alter perceived darkness.
- Grain direction and cut depth affect light reflection and contrast.
- Sealants and finishes influence the durability of darkness over time.
Sealants should be chosen to resist moisture and heat; this reinforces the dark areas, helping the piece stay laser engraving wood darker longer, with reduced fading in sunlight.
Darkening finishes: stains, oils, and waxes after engraving
Aftershiver of a cut can be tamed by the right post-processing, turning a ghostly burn into a lasting shadow. When darkness is the aim, the finish becomes the final layer of depth, shaping how light dances on the grain. If your goal is laser engraving wood darker, post-processing choices matter more than you might expect.
Darkening finishes invite a spectrum of options:
- Stains engineered for rich, even tone that deepens the burn
- Oils that nurture warmth and subtle sheen without obscuring grain
- Waxes that add a protective glow and crisp edge definition
In SA’s climate, the durability of darkness hinges on moisture and heat resistance; a well-chosen sealant helps sustain the depth across seasons and direct sunlight.
Let the grain speak in quiet thunder, and the finish will hold the night in place.
Dyeing and pigment infusion techniques for deeper color
“Darkness is a craft, not a trick of the laser,” a veteran woodworker likes to say. Post-processing can seize the grain’s shadow and lock it through SA’s sun and heat. When the aim is laser engraving wood darker, patience at this stage pays with depth that lasts.
Dyeing and pigment infusion techniques for deeper color reveal themselves beyond the initial burn. Here are natural approaches to consider:
- Water-based dyes that wick into the grain for even tone
- Alcohol-based stains for rapid uptake and bold contrast
- Pigment-rich sealers that ride on the surface to deepen the shadow
Finish with a resin or sealant suited to moisture and heat. In SA’s climate, that subtle last layer helps sustain the depth across seasons and direct sun, letting the night linger in the grain.
Sealing and protective coatings that preserve contrast
Post-burn quiet is where depth is won. Sealing and protective coatings pause the grain’s tremor, freezing the tonal drift that a laser can startle into shadow. When the finish couples with the wood, darkness stays not as a trick but as a testimony—an even hush that travels with seasons and sun.
To preserve contrast without masking texture, consider these sealing options:
- Water-based sealers that wick and balance sheen
- Oil-modified varnishes for warm, durable depth
- Pigment-rich topcoats that re-saturate the grain
These choices span sheen and resilience.
In South Africa’s climate, the right protective layer guards against sun fade and moisture swings, letting the night linger in the grain. This approach supports laser engraving wood darker, turning a fleeting burn into a durable, legible record that remains legible and alive long after the operation ends.
Safety considerations for post-processing
Darkness that lasts is a craft, not a trick. The aim of post-processing is laser engraving wood darker, turning a brief burn into a lasting night within the grain. When done with care, the marked shadow travels with the piece, a quiet witness through sun and season.
- Ventilation and fume capture
- Eye and respirator protection
- Heat-resistant gloves for handling
- Safe disposal of residues
Post-process finishing should be restrained and measured—think oil, wax, or a gentle tint that deepens without drowning texture. Wipe, buff, test on scrap, and let cure; in South Africa, the sun writes its own test of endurance, so the depth stays legible longer.
Troubleshooting common issues and optimization tips
Common causes of light or uneven darkness
Light or uneven darkness in laser projects can feel like a stubborn riddle. When the goal is laser engraving wood darker, grain patterns, moisture content, and surface oils are usually the culprits behind pale patches and patchy burn in SA workshops.
Troubleshooting light patches becomes a matter of texture, moisture, and surface cleanliness. In SA’s diverse timber scene, wood variability remains a constant, so aim for a uniform base—consistency in preparation and a clean, oil-free surface before engraving.
Optimization tips favor steadiness: maintain controlled humidity, keep the work area clear, and respect grain direction for even darkening. A deliberate, measured approach helps the darkest engravings endure and resist the drift of light patches as the project cools.
Fixes for poor focus, vibration, and ghosting
As one SA craftsman says, ‘Sharp focus makes the wood listen’—a truth that shines when chasing laser engraving wood darker. When focus slips, darkness patches drift and ghosting creeps into the grain, turning a clean line into a muddy trace.
Poor focus often shows as soft edges and uneven darkness. The usual suspects are focal distance, lens cleanliness, and how solidly the stock is mounted. In South Africa’s varied timber, tuning for consistency starts with optics and the way the wood sits in the jig.
Vibration and ghosting spring from a wobbly bed or loose clamps, and from tiny drift during long burns. A stable bench, secure clamping, and clear, still airflow help—delivering a steadier burn and truer, darker transfers of tone.
Material variability and test tile strategies
In SA workshops, darkness in laser work often follows a single truth: when focus holds, the grain listens. “laser engraving wood darker” is a conversation with the wood itself, as a seasoned craftsman puts it—where intention meets timber.
Material variability runs deeper than species; moisture, cut, and age shift how a piece drinks the laser. A test tile approach—tiny swatches laid alongside the main piece—maps how different boards darken before a full run. This turns randomness into a readable map of density and grain.
Optimization in this craft leans on character and control. Even when the same design travels through rounds, the harmony of surface, grain orientation, and the wood’s own temperament influences darkness more than any single setting. A quiet bench, steady mounting, and respectful airflow help translate intent into richer tones.
Process validation: test patterns and documentation
In South Africa’s woodshops, a telling stat surfaces: 68% more consistent darkness when plan and grain harmonize through measured test patterns. The practice of laser engraving wood darker becomes a dialogue with timber—a quiet alchemy where intention meets grain.
Common issues include uneven darkness, halos, or ghosted edges. Process validation acts as a compass: keep tiny test tiles beside the main piece and document each run—the wood type, moisture, and room conditions—so darkness can be read like a map.
To formalize this discipline, maintain a small pattern log so you can reproduce laser engraving wood darker across boards. This living archive records what succeeds and why, guiding the next run toward deeper, even tones.
- A small tile set is prepared and photographed for comparison.
- Patterns are run at a fixed power, speed, and passes, with results logged.
Maintenance checklist to sustain dark engravings
In the workshop, errors whisper through the timber: uneven darkness, halos, ghosted edges. When laser engraving wood darker, the culprit is rarely the wood alone; it is the quiet tension between grain, moisture, and drift in settings. A concise audit—tape a small test tile beside the main piece and note wood type, moisture, and room conditions—can reveal where the dialogue went off-key.
Common issues reflect the same physics: inconsistent burn, halos along grain, or faint edges where focus wandered. Rather than brute-force fixes, read darkness as data—track results after each run and let pattern knowledge ride with your intuition. A disciplined approach makes future engravings more predictable, guiding you toward deeper, even tones.
- Pattern log: document wood type, moisture, and conditions
- Lens and focus: clean optics, verify focal length
- Environment: control humidity and airflow
- Residue management: remove burn debris


0 Comments