Understanding laser engraving design software
What the software does for engravers
A crisp file, a sharp finish, and a competitive edge! In South Africa’s bustling workshops, the right software can cut production time and boost consistency. Understanding laser engraver design software is the first step: it translates ideas into machine-ready instructions and removes guesswork from the process, and we see the transformation in real-world shops.
- Layout and nesting to maximize material use
- Material presets, kerf, speed, and power controls
- Live preview and toolpath simulation
- Output in industry-standard formats for compatibility
For engravers, the software handles nesting, material settings, kerf compensation, and toolpath previews, letting you spot issues before a cut. It also aids collaboration with clients by exporting proofs and compatible formats. In a country with diverse materials, from timber to acrylic, the software adapts to needs.
Differences between vector and raster design workflows
In South Africa’s bustling workshops, laser engraver design software acts like a compass, turning bold ideas into crisp, repeatable engravings. The choice between vector and raster workflows shapes how a design translates to the machine, affecting precision, speed, and material behavior. A well-tuned workflow reduces misreads and surprises on the shop floor.
- Vector workflows use mathematical paths for scalable outlines—perfect for logos and text that must stay crisp at any size.
- Raster workflows interpret pixels, delivering nuanced shading and photo-like textures, but at fixed resolution and with larger files.
- Hybrid approaches blend both, letting engravers capture detail while preserving edge clarity for cutting tasks.
Within the SA market, these choices map to materials from timber to acrylic, shaping throughput and consistency. In practice, the way vector and raster engines are implemented in software maps to how shops plan runs, quote jobs, and communicate results to clients.
Common terms and file types
South Africa’s bustling workshops run on precision, patience, and the right file types. A single misstep in terms or format can turn a smooth run into a scrap heap. Mastering common terms and file types is essential for laser engraver design software workflows—a compass that keeps paths clean and results predictable.
Here are the go-to terms and formats you’ll meet.
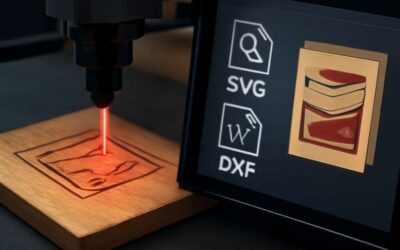
- SVG, AI, DXF, PDF — scalable vector formats you’ll want in your toolbox
- PNG, JPG, TIFF — raster images for textures and photo-like engravings
- G-code, CAM, kerf, feed rate — the hands-on language of the machine
- DPI, PPI, color depth — how detail survives the transfer from screen to material
Choosing formats that align with your hardware keeps throughput smooth and surprises at bay.
Why software choice matters for output quality
Precision in a South African workshop is a quiet anthem, and the software you choose conducts the score. A single switch can turn a flawless plan into scrap, or translate vision into a reliable line. laser engraver design software is the compass that keeps paths true and results predictable.
Choose wisely, and your output gains speed, consistency, and texture. The software must harmonize with your hardware, accepted file formats, and the operator’s workflow—because the machine only executes what the program commands.
- Hardware compatibility
- Toolpath optimization
- Color and material profiling
Think of it as a bridge between intention and material. The right suite makes ideas repeatable, scalable, and proudly African in its precision.
Key features to evaluate in laser engraving software
Vector drawing and text handling
In the workshop where light meets metal, every vector line is a promise kept at any scale. The right laser engraver design software treats drawing as choreography and text as part of the message, not an afterthought. When evaluating options, focus on how well vector drawing and text handling align with your craft, whether in Cape Town studios or Johannesburg workshops.
Vector precision and text management stand out as the core. Look for precise node editing, robust font handling, and the ability to apply text along curves or on paths, with kerning and baseline alignment.
- Vector precision and granular node editing
- Text handling: fonts, kerning, and baseline alignment
- Path operations for on-curve lettering and complex outlines
South Africa’s maker communities demand dependable preview tools and export options to anticipate kerf and depth, ensuring that what you design translates faithfully to the substrate.
Bitmap image editing and raster engraving settings
In South Africa’s vibrant workshops, a single pixel can determine the difference between a flawless mark and a misfire. The right laser engraver design software treats bitmap editing as a craft, delivering faithful grayscale rendering and nuanced dithering that translate cleanly to metal, wood, and acrylic.
- Bitmap editing fidelity: color depth handling, anti-aliasing, and crisp edge transitions.
- Raster engraving settings: DPI, grayscale versus bitmap modes, pass counts, and nuanced speed/power balance.
- Preview and export accuracy: kerf compensation, depth prediction, and substrate-specific profiles.
These considerations underscore why SA makers value tools that offer dependable previews and export options, helping translate intention into tangible results.
Machine compatibility and export formats
In SA workshops, the true bottleneck isn’t the hardware—it’s software that speaks the machine’s language and keeps expectations honest. “If the file won’t talk to the machine, the cut never leaves the cradle,” a Cape Town maker likes to say. When evaluating key features, machine compatibility and export formats decide whether your ideas are faithfully carved into metal, wood, or acrylic.
When evaluating laser engraver design software, look for broad controller support (GRBL, Ruida, Trocen), bed-size compatibility, and firmware quirks; for export formats, vector and raster options, and kerf and depth data. The right choices translate intent into tangible results, with previews and profiles that actually ship as promised.
- Machine compatibility: supported controllers (GRBL, Ruida, Trocen), bed sizes, and firmware quirks
- Export formats: SVG, DXF, AI, PDF for vectors; PNG/JPG for rasters; with kerf and layer data
- Profile presets: substrate profiles, speed/power defaults, and project templates
Live preview and toolpath visualization
Live preview isn’t a gimmick; it’s the quiet engine preventing surprises on cut day. In SA shops leaning on toolpath visualization, mis-cuts and singed edges become rare—Cape Town studios reporting noticeable waste reductions when the preview is trusted. When evaluating laser engraver design software, you want a system that shows exactly how vectors translate to material, including kerf, depth, and collision checks before a blade ever bites.
- Real-time toolpath color-coding so you can spot overlaps in a glance
- Kerf and depth simulation to align engraving with material thickness
- Live bounding-area previews that reflect bed size and axis limits
With previews that actually ship as promised, designers translate intent into tangible results, keeping expectations honest and projects humming in SA studios.
Workflow optimization for laser projects
Importing artwork and preparing materials
Workflow optimization for laser projects hinges more on precision than bravado. In laser engraver design software, the real magic starts when artwork lands in the right format and the machine sighs with relief rather than groans. In SA, 68% of project delays trace back to messy imports. Clean imports cut the chaos.
Preparing materials should be treated like inventory for a kitchen: colors, textures, and thicknesses must align with the project’s tempo. Import features that handle fonts and bitmaps gracefully prevent later surprises, a small mercy that earns loyalty from clients here in SA.
- Asset libraries and version control
- Material presets and thickness tolerances
- Preview accuracy and color management
Done well, the flow yields predictable toolpaths, less rework, and dinners that don’t get burned by last-minute tweaks. In South Africa, laser engraver design software turns local ingenuity into crisp, gallery-ready pieces—and that punchy reliability keeps chatter at the cutting edge.
Toolpath planning and parameter presets
Across South Africa’s studios, uptime climbs when toolpath planning becomes poetry in motion. A snapshot from local workshops shows up to 12% less waste when feeds, speeds, and ramping are locked into reliable presets. laser engraver design software lets you choreograph those steps, turning messy data into a smooth, repeatable flow that the machine greets with quiet relief rather than groans.
- Toolpath templates aligned to material type and thickness
- Parameter presets for feeds, speeds, passes, and burn-aware ramping
- Live previews that simulate cut paths before a single tool is touched
- Versioned presets to protect consistency across jobs
With this choreography in place, workflow becomes predictable and pleasurable—the kind of precision that earns trust and invites growth.
Proofing, preview, and error checking
Across South Africa’s studios, a focused proof-and-preview loop cuts misreads and waste by as much as 14%. The secret is a workflow that treats every file as a living plan, not a single print. This is where laser engraver design software excels—turning raw data into a reliable forecast, catching errors before a laser ever fires.
Proofing, preview, and error checking become a choreography of checks and balances. In practice, a few deliberate steps reveal issues before production, saving material and time:
- Preflight data integrity and unit consistency
- Live preview with burn-aware simulation to spot collisions
- Automated validation against material and laser limits
With the right workflow tools, a project evolves from a gamble to a dependable performance, where every job reads true on the first run.
Batch processing and project templates
Across South Africa’s studios, a disciplined batch workflow can cut lead times and waste by double digits. The edge lies in laser engraver design software that treats each project as a repeatable, orchestrated process rather than a one-off sprint. Batch processing and project templates turn scattershot gigs into predictable performances.
Key components that make this flow sing:
- Consistent parameter presets across jobs
- Reusable project templates for future runs
- Centralized asset and material libraries
With these tools, the project moves from improvisation to precision. Batch processing and templates erase guesswork, so files reopen with the right settings on the first pass—no drama, just dependable outcomes.
Calibration and testing on scrap material
Across South Africa, calibration drift can waste a surprising slice of production time—some studios report up to 12% rework. laser engraver design software reframes that risk as a measurable parameter, not a hidden flaw. When calibration becomes reproducible, settings travel with the file and proofs feel foreseen.
Calibration and testing on scrap material aren’t chores; they’re investments in consistency. The software’s live previews and centralized libraries help validate parameters before final runs, keeping projects predictable and dignified with fewer surprises on the bench!
Small shifts in material behavior become legible through a thoughtful workflow.
- Material consistency and presets
- Parameter variance across runs
- Data-driven feedback from tests
Output quality then reads like a traced lineage, not a gamble.
Hardware integration and machine communication
Networking and USB connections
A tight handshake between software and hardware is the quiet engine behind precise engraving. In South Africa’s workshops, the resilience of that link can decide a flawless run or a stubborn misfire. Industry chatter suggests up to 30% downtime stems from flaky comms. With laser engraver design software, you gain a cockpit where signals travel clearly and timing stays exact!
Networking and USB connections are lifelines that keep that cockpit talking. When hardware and software speak the same language, you cut drift and downtime. Here are avenues a professional South African shop relies on:
- USB-based plug-and-play interfaces for immediate recognition
- Ethernet or networked PCs for shared projects and remote monitoring
- Wireless options like Wi‑Fi or Bluetooth for portable setups and calibration tasks
Across South Africa, secure connections and simple diagnostics keep machines honest. When communication is steady, your engravings retain the same precision from idea to piece.
G-code vs vendor-specific formats
Precision is a quiet pact between hardware and imagination. In South Africa’s workshops, up to 30% downtime is traced to flaky comms, a statistic that can turn a clean run into a stutter. With laser engraver design software, you cradle that pact, ensuring the controller and bed share the same rhythm from start to finish.
Two communication philosophies shape your machine’s heartbeat: G-code, the long-backed global standard, and vendor-specific formats that sing in a brand’s dialect. G-code invites flexibility and compatibility across models; vendor formats can optimize performance for one line, but lock you in.
- G-code: broad support, easier migration, community-driven tweaks
- Vendor formats: tight integration with a single system, faster calibration for that brand
The software bridges both worlds, translating signals, validating toolpaths, and presenting safe previews before a single spark. In this way, your shop stays agile, ready to adapt to new machines and evolving workflows.
Setting machine parameters in software
In the workshop, the controller is a quiet conductor. With laser engraver design software, you bridge the hardware handshake and set the machine parameters in one fluent interface, so speed and focus stay in harmony with the bed. A clean, stable link transforms a potentially finicky run into predictable results. In South Africa’s workshops, reliable comms aren’t luxury; they’re the backbone that keeps production lines moving when pressure rises.
Key parameter groups align with your workflow:
- Power, speed, and acceleration tuned for material and gaze-worthy detail
- Focus height and offset alignment to lock the beam on target
- Homing, zeroing, and safe interlocks to prevent drift
- Queueing, tolerances, and error-state handling to maintain rhythm
When these knobs live in the software, the path from design to mark stays smooth and safe.
Firmware updates and compatibility notes
In the workshop, a quiet conductor grooms the process; hardware communication is the handshake that keeps rails and beams honest. laser engraver design software bridges that handshake, letting you tune controller communication and set machine parameters in one fluent interface, so speed and focus stay in harmony.
Firmware updates and compatibility notes form the guardrails. When the controller firmware and software release drift apart, precision wobbles and safety interlocks misbehave. A thoughtful approach surfaces version requirements, keeping South Africa’s shops moving in lockstep.
- Version alignment between controller and software drivers
- Update distribution: networked vs portable firmware
- Digital signing, rollback options, and fail-safes
- Evolution of supported features such as focus sensing or interlocks
That harmony is what makes laser engraver design software a steady partner in demanding environments—especially in South Africa—where dependable comms aren’t a nicety but a backbone of productive, shipshape work.
Advanced design techniques and optimization tips
Vector optimization for intricate engravings
Artisans across South Africa know that the edge between a cut and a miracle lies in how lines are built. In laser engraver design software, vector optimization trims away noise, keeping crucial geometry intact while the laser follows a simpler, cleaner path. Intricate engravings become legible in the preview: curves breathe, corners relax, and the machine translates intent into a flawless pass.
Beyond software, the craft is about discipline and taste. The choice of material, the tempo of the engagement, and an artist’s eye for balance matter as much as the tool. When optimization is done with restraint, the piece resonates with quiet precision, a signature of SA studios delivering craft with care!
Power, speed, and passes: achieving fine results
Light folds over the bench as I coax edges into readability from a digital sea. Advanced design techniques in laser engraver design software turn raw vectors into intimate lines; power, speed, and purposeful passes choreograph a motion that respects material warmth and keeps detail alive. The result is a path that feels inevitable, almost musical, translating intention into a delicate, flawless trace.
- Power allocation and dwell behavior to control heat buildup
- Strategic, multiple shallow passes to preserve edge sharpness
- Path smoothing near corners to maintain legibility
Beyond the settings, the tempo of a session and an artist’s eye for balance decide the piece’s character. In South Africa, SA studios measure craft by the quiet precision that endures after the machine stops, proof that taste can outrun the tool.
Color mapping and multi-pass engraving strategies
“Color is the engine of precision,” says a Cape Town engraver, and in South Africa the claim rings true. In laser engraver design software, color mapping becomes a conductor’s baton, directing power, speed, and passes as if the design could speak in light. Subtle shifts emerge, edges tighten, and the surface breathes with intention.
- Assign each color its own power and speed profile for crisp corners
- Use shallow, multiple passes to minimize heat buildup
- Finish with a light pass to sharpen tight curves
The result is a readable, resonant trace that feels inevitable—an artwork that respects material warmth and speaks with light rather than shouting with heat.


0 Comments