Understanding Laser Engraving Basics
What is laser engraving and how does it work?
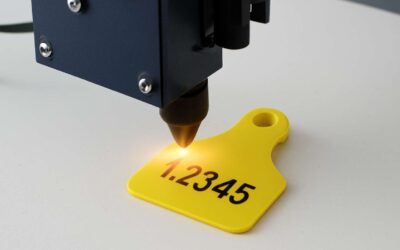
Laser engraving is a precise, heat-based process that etches marks on materials with a focused beam. In South Africa’s workshops and maker spaces, timber, acrylic, and leather become durable labels and keepsakes in moments. If you’re curious about laser engraving how to, here’s the gist.
- Laser source (CO2 or fiber)
- Focusing lens
- Motion system and sturdy bed
- Control software
The beam is steered by precise software, tracing patterns and text while heating and vaporizing micro-layers. Material choice dictates depth and shade, so a quick tweak here or there yields bold contrasts or delicate etches.
Common laser types and their uses
In South Africa’s maker spaces, a single laser beam can turn offcuts into keepsakes in minutes. The basics remain simple: a focused slice and controlled heat etch a permanent mark on many materials.
Two common laser types shape what’s possible: CO2 lasers handle timber, acrylic, and leather with clean edges; fiber lasers dive into metals and coated plastics with durable marks.
Common uses by material type:
- CO2: timber and plywood, acrylic, leather—great for signs, panels, and gifts
- Fiber: metals such as stainless steel, brass, and coated surfaces—ideal for nameplates and hardware
For anyone exploring laser engraving how to, knowing the type helps you set expectations.
Key terminology every hobbyist should know
A single, well-timed pulse can turn scrap into keepsake in minutes—a punchy reminder that precision outpaces luck. In South Africa’s maker spaces, laser engraving basics reveal themselves in plain terms: you shape heat, avoid scorch, and let the material tell its story. For those exploring laser engraving how to, grasping the key terminology makes the journey smoother.
Vector vs. raster, kerf, and focal length are the pillars. Power, speed, and DPI translate into depth, edge quality, and detail. These terms aren’t jargon; they are the language that helps you predict outcomes and refine technique with intention.
- Vector: outlines and continuous lines
- Raster: filled areas and textures
- Kerf: the beam’s material width removal
- Focal length: distance to bring the beam to a fine point
Applications and project ideas to get started
Heat is a brush, and the material a canvas. In South Africa’s buzzing maker spaces, laser engraving basics invite you to dream in lines and light, transforming wood, acrylic, and leather into intimate keepsakes. Precision turns potential into tangible memory faster than luck.
Here are project ideas to spark your first ventures, concise enough to test ideas without a full workshop setup:
- Wooden coasters with etched patterns
- Leather tags for bags or gear
- Clear acrylic name plaques
- Minimalist key fobs or bottle openers
For those laser engraving how to, the journey rewards curiosity with predictable finishes and personal flair. Your designs become legible stories under light and time.
Advantages, limitations, and safety considerations
In South Africa’s maker spaces, a beam of light can turn rough timber into memory. A crisp laser finish often beats days of handwork and speeds simple projects by around 40%. Understanding laser engraving basics shows why: precision, repeatability, and easy personalisation. For those curious about laser engraving how to—this overview flags the core advantages, limits, and safety needs that keep creativity steady.
Key advantages include:
- Precision and repeatability with tight tolerances
- Versatility across wood, acrylic, leather
- Low-touch production and easy customization
Limitations include material compatibility, depth control, and setup costs. Safety considerations demand eye protection, proper ventilation, and never leaving a running laser unattended; dust and fumes deserve a fume extractor, and fire risk must be managed, especially in dry SA climates.
Choosing Equipment and Materials
Selecting a laser engraver: diode vs CO2 vs fiber
South Africa’s maker benches tell a truth: the right laser is the difference between a rough sketch and a polished emblem. ‘The tool you choose writes the first line of your story,’ a veteran craftsman reminds us. When considering laser engraving how to, beginners confront a forked road before the first cut!
Diode systems are compact and budget-friendly, ideal for small pieces on plywood, leather, and some plastics. CO2 units handle broad material sets—wood, acrylic, glass—yet they demand space and ventilation. Fiber lasers outperform metals, but at a premium and stricter upkeep.
- Budget and total cost of ownership
- Materials you plan to engrave
- Available space and ventilation
Across South Africa’s studios, budget, space, and ambition mingle, shaping what projects the tool can support.
Understanding power, speed, and frequency settings
In South Africa’s buzzing maker benches, a single choice can tilt a project from rough sketch to polished emblem. The core of laser engraving how to is simple: it’s about intention, not brute force, and about tuning more than buying. It begins with power, speed, and frequency as partners.
Power, speed, and frequency are not secret knobs; they’re language you use to tell the material what to reveal.
- Power sets penetration and contrast
- Speed controls dwell time and edge quality
- Frequency governs pulse cadence and heat buildup
Consider what South Africa’s studios can fit: budget, space, ventilation, and the materials you plan to engrave—plywood, leather, acrylic, glass. The right mix shapes what projects the tool can support.
Material compatibility: wood, acrylic, metal, leather, glass, and more
In South Africa’s buzzing maker benches, a single material choice can tilt a project from rough sketch to polished emblem. Practical wisdom travels fast here: intention, not brute force, guides every cut and mark. This is the heart of laser engraving how to—align material with purpose.
Material compatibility is your compass when mapping a project across plywood, acrylic, metal, leather, glass, and more.
- Wood: forgiving, warm engravings
- Acrylic: crisp edges, vivid color
- Leather: patina and burnish
- Glass: frosted etch
- Metal: coatings or specialty systems
Budget, space, and ventilation shape what the tool can reach in a Cape Town studio or Johannesburg workshop. Align your picks with the materials you plan to honour; the right mix makes projects sing and keeps workflows sane.
With the mythic patience of seasoned craftspeople, equipment choice becomes a quiet spell rather than a loud purchase, turning a humble bench into a disciplined forge of light.
Engraving vs etching: what’s the difference and when to use
In South Africa’s shadowed workshops, a single choice defines the mark: engraving or etching. The line that follows can outlive the maker, a quiet glyph that resists the air itself. In the laser engraving how to journey, two temperaments emerge: engraving for depth and tactile relief, etching for a pale, frost-like trace on the surface.
What follows is a concise comparison:
- Engraving: deeper, permanent depth that invites touch and shadow.
- Etching: shallow, precise lines that preserve gloss and texture.
Choosing between them hinges on the material’s character and the intended mood—wood’s grain, metal’s glare, or glass’s restraint—within a Cape Town studio’s careful climate and Johannesburg workshop’s measured airflow.
Workholding and fixtures for precision projects
In South Africa’s sunlit studios, a single hold can decide the outcome. For laser engraving how to, the right equipment and fixtures are the quiet backbone of precision. The beam shines, but the grip tells the story—clean starts, clean cuts, fewer surprises.
When selecting a laser, consider bed size and power stability, and how well it suits your preferred materials—wood’s grain, metal’s glare, glass’s restraint. Local conditions in Cape Town or Johannesburg matter: a steady bench, clean airflow, and dust control help keep tolerances honest.
- V-blocks and edge clamps for round or awkward shapes
- Adhesive fixtures like double-sided tape or removable tabs
- Custom jigs tailored to routine projects
That calm, measured approach mirrors the South African workshop—where patience, light, and hold contribute as much as the laser itself.
Design, File Preparation, and Quality Settings
Preparing vector vs raster designs for engraving
Design sets the stage where a laser makes or breaks a piece. Sharp vector outlines keep edges crisp, while raster textures can simulate shading—great for brass-like finishes or wood grain. For those asking laser engraving how to achieve razor-thin edges, vector paths are your best ally; keep curves clean, and avoid over-complicated fills. In South Africa’s crafts scene, clean geometry wins the eye before the rest of the story unfolds.
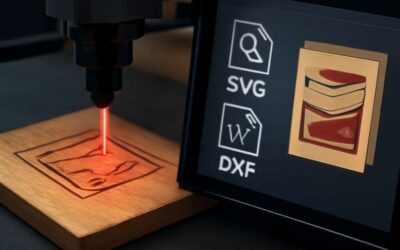
File Preparation is the quiet, meticulous partner to bold design. Before you cut, consider how your file travels from screen to surface:
- Fonts that shift when rendered are avoided by outlining or safely neutralizing type
- Closed paths and clean geometry reduce ambiguity in the engraving
- Images should be high-contrast and prepared with appropriate raster resolution
- Minimise stray points to keep the toolpath elegant and predictable
Quality Settings determine the difference between a good piece and a remarkable one. A considered approach to how the laser is fed to your material yields consistent, share-worthy results:
- Balance texture and depth by tuning power and speed to the material’s character
- Choose vector engraving for edges and raster for shading, mindful of density and pass count
- Test on scrap to verify contrast and fidelity before committing to the final piece
Choosing the right color and layer strategies
Design shapes the cut, and color-layer strategy guides the laser’s breath—clean geometry can boost first-glance impact by up to 30% in SA crafts. For laser engraving how to, separate vector edges on one layer and shading textures on another; this yields razor-thin lines and controlled grain. In South Africa, clear geometry lets the story unfold before the texture does.
File Preparation keeps the journey smooth from screen to surface. Outline fonts, close paths, and ensure crisp geometry; high-contrast images with appropriate raster resolution; minimise stray points to keep the path elegant.
- Fonts that shift are addressed by outlining or neutralizing type
- Closed paths and clean geometry reduce ambiguity
- Layer mapping creates clear passes
- High-contrast imagery supports fidelity
Quality Settings guide how textured depth is achieved. Balance power and speed; pick vector for edges and raster for shading; set a conservative pass count; test on scrap to confirm fidelity.
Resolution, dithering, and image tracing basics
Design isn’t just what you see; it’s how the laser breathes. In South Africa, clean geometry reads first and invites texture later, because a sharp outline lets the story unfold before the shading arrives. This “laser engraving how to” mindset treats lines as pathways, not obstacles.
File Preparation keeps chaos at bay: outline fonts, close paths, and ensure crisp geometry; high-contrast imagery with suitable raster resolution; minimise stray points to keep the path elegant.
- Typography stability
- Geometric fidelity
- Minimal node count
Quality Settings govern tonal depth. Start with a sensible resolution; apply dithering to simulate gray levels; use image tracing basics to convert bitmaps into workable vectors.
Optimization tips for clean edges and burn-free engravings
Design isn’t just what you see; it’s how the laser breathes. Clean geometry reads first in South Africa, inviting texture later. Sharp outlines let the story unfold before shading arrives. For laser engraving how to, treat lines as pathways—guides for light, not obstacles.
File Preparation keeps chaos at bay: outline fonts, close paths, and crisp geometry; high-contrast imagery with suitable raster resolution; minimise stray points to keep the path elegant.
- Typography stability and crisp geometry
- Geometric fidelity with minimal node count
- Minimal stray points for clean edges
Quality Settings govern tonal depth. They hinge on material behavior and edge fidelity rather than chasing every shadow. In practice, prioritize readable contrast, predictable burn lines, and scalable results that perform in workshop conditions across South Africa, delivering burn-free engravings.
How to test settings with material swatches
Design isn’t merely lines on a page; it’s how the laser breathes. In South Africa’s quiet workshops, clean geometry reads first, inviting texture to arrive later. For laser engraving how to, treat lines as pathways—guides for light, not obstacles.
File Preparation keeps chaos at bay, a ritual calm in the workshop: outline fonts, close paths, crisp geometry; high-contrast imagery and suitable raster resolution; minimise stray points to keep the path elegant.
Quality Settings govern tonal depth and edge fidelity, not every shadow chasing. Focus on readable contrast and predictable burn lines so outcomes scale across South Africa’s workshops, delivering burn-free engravings. Observing how substrates respond to settings reveals the dance between light and material.
Techniques, Finishing, and Creative Projects
Layering and multi-pass strategies for depth
Depth is the first thing an engraving reveals, and in the right light it becomes a story you can trace. For those asking laser engraving how to achieve real nuance, layer your passes: a light outline, then deeper runs with tuned speed and power to build tonal shifts. Test on scrap material to gauge responses.
Finishing ties depth to durability. A light sanding removes scorch, then a sealant or clear coat locks in contrast. On wood, a subtle stain heightens layered effects; on metal, a patina fill can reveal undercuts. Follow cure times for best results.
In creative projects, layered engraving shines on keepsakes and display pieces. Try this approach:
- Layer the main motif on the base, then add secondary textures as shadow layers
- Highlight recessed areas with a touch of color fill
- Vary pass depth to separate foreground from background
The result is tactile art that resonates with South African clients and audiences alike.
Finishing techniques: paintfill, laser darkening, and sealing
In techniques, nuance is a quiet craft. For those wondering laser engraving how to achieve depth, subtle tonal shifts emerge from calibrated passes and thoughtful power. Light, shadow, and grain play across the surface, turning a simple mark into a story that invites the eye to linger.
Finishing elevates the carved story. Paintfill adds color pockets where the light rests, laser darkening deepens contrast in recessed lines, and sealing locks the moment so the artwork ages gracefully.
- Paintfill for color depth
- Laser darkening for tonal richness
- Sealing to protect and preserve
In creative projects, keepsakes and display pieces across South Africa take on a new life when finishing details align with the piece’s narrative. These finishes translate into heirloom quality that resonates with local artisans and collectors.
Masking and masking tape methods to protect surfaces
Power is a whisper; depth is earned through calibrated passes and deliberate power. In laser engraving how to, light, shadow, and grain travel across the surface, turning a simple mark into a narrative that invites the eye to linger.
Finishing doesn’t simply seal the work; it amplifies its voice. Subtle color pockets catch the light in recessed corners, while strategic tonal shifts breathe complexity into the design without shouting.
Masking protects boundaries as the project travels from setup to show. Consider masking tape techniques that shield surrounding surfaces and keep edges crisp.
- Painter’s blue tape for delicate woods and plastics
- Kapton tape for heat resistance on metalwork
- Low-tack masking film for curved surfaces
Across South Africa, these finishes and masking practices translate into keepsakes that speak of place, craft, and careful hands.
Popular project ideas and case studies
Across South Africa, the craft sector is accelerating—laser engraving how to has turned humble materials into lasting stories. Balance is everything: precision comes from calibrated power, measured passes, and a patient eye that reads how light, shadow, and grain travel across a surface. The result is more than a mark—it’s a conversation that invites the viewer to linger.
Finishing doesn’t just seal the work; it amplifies its voice. Subtle color pockets catch light in recessed corners, while tonal shifts add depth without shouting. Masking and edge protection remain essential as the piece travels from setup to show.
Around the country, creative projects flourish when ideas become keepsakes. Popular project ideas and case studies range from bespoke wedding mementos to corporate awards and community tokens. The right finishing, color strategy, and thoughtful design elevate the ordinary into a narrative you’re proud to share.
- Heritage wood coasters
- Leather key fobs
- Metal nameplates
Troubleshooting common issues during engraving
Precision is a living thing: in laser engraving how to, technique is a dialogue between calibrated power, measured passes, and a patient eye that reads how light and grain travel across a surface. Across South Africa, studios balance speed and focus to avoid scorch marks.
Finishing doesn’t just seal; it magnifies the voice. Subtle color pockets catch light and sealing layers deepen contrast. Masking and edge protection remain essential as the piece travels from setup to show.
Creative projects demand nimble troubleshooting during engraving to keep every narrative thread intact.
- Faint or uneven lines—adjust focus and test on scrap.
- Burn halos—lower power or increase passes.
- Ghosting—check lens, ventilation, and settings.
- Misalignment—verify fixtures and origin marks.
Safety, Maintenance, and SEO for Laser Engraving
Laser safety best practices and PPE essentials
Safety is the quiet engine behind every line etched in light. In South Africa’s shops, PPE and protective rituals stand between curiosity and consequence, guiding the maker as surely as a compass.
- Eye protection rated for the laser wavelength
- Respiratory protection for fumes and particulates
- Flame-resistant clothing and heat-resistant gloves
- Ventilation and an eye wash station
Maintenance is reverence for your tool: optics, vents, and seals require regular care in dialogue with the supplier’s guidance.
From an SEO perspective, laser engraving how to content should be clear, accessible, and locally resonant. Crisp headings, descriptive alt text, and thoughtful keyword placement keep readers engaged while search engines see the craft’s relevance.
Maintenance routines to extend laser life
Safety is the quiet engine behind every line etched in light. In South Africa’s bustling workshops, a disciplined maintenance routine is the compass that keeps precision faithful to intent. When exploring laser engraving how to, the ritual of care anchors risk to respect.
Maintenance routines extend laser life by safeguarding optics, vents, and seals. Treat these as living components you converse with—the supplier’s guidance, your observations, and timely replacements. Consider a simple triad:
- Optics and lens alignment
- Ventilation and filter integrity
- Seals, gaskets, and cabling wear
SEO note: clear, locally resonant phrasing helps readers and search engines alike. Descriptive alt text, crisp headings, and thoughtful keyword placement keep this craft front and center for SA audiences.
Ventilation and air filtration considerations
In South Africa’s bustling workshops, safety is the quiet engine behind every line etched in light. For those pursuing laser engraving how to, the air you work in matters as much as the settings on the table. Vigilant ventilation and robust air filtration keep smoke, fumes, and dust at bay, safeguarding both operator and optics and preserving consistent results.
Maintenance routines extend laser life by safeguarding optics, vents, and seals. Treat these as living components—consult your supplier, observe wear, and schedule timely replacements. Consider this triad:
- Optics and lens alignment checks
- Ventilation and filter integrity
- Seals, gaskets, and cabling wear
SEO note: clear, locally resonant phrasing helps readers and search engines alike. Descriptive alt text, crisp headings, and thoughtful keyword placement keep this craft front and center for SA audiences. The phrase laser engraving how to should appear naturally in context, guiding readers toward safer, more precise practice.
Documenting projects for portfolio and client outreach
In South Africa’s busy workshops, safety becomes the quiet engine behind every line etched in light. The most persuasive project records prove you understand risk as well as technique. laser engraving how to stories unfold in your portfolio when you document setup choices, test patterns, and early results with honesty and clarity.
Maintenance is a narrative of care: optics stays sharp, vents stay clear, seals stay snug. I treat these as living components—note wear, schedule replacements, and keep a tidy audit trail that travels with each job.
On the SEO front, your portfolio deserves to be found by local readers and clients. Clear headings, descriptive alt text, and context-rich descriptions help search engines read the story behind the work. The goal is to present not just images, but a narrative of deliberate, safety-aware craftsmanship that resonates throughout South Africa.
Creating content that ranks: metadata, keywords, and user intent
In South Africa’s busy workshops, safety is the quiet engine behind every line etched in light—and a clean safety record can cut downtime by up to a third. The craft demands PPE, solid ventilation, and a fire-aware zone. A short safety checklist keeps the workflow calm and precise:
- PPE: approved goggles, gloves, and respirator when fumes arise
- Ventilation: active exhaust and air filtration
- Housekeeping: clear spill-free floors and accessible extinguishers
Maintenance reads like a stewardship log—optics stay sharp, vents stay clear, seals snug. Treat components as living parts: note wear, schedule replacements, and preserve a clean audit trail tied to each job.
On the SEO front, metadata, alt text, and user intent guide the journey. Structure content for local readers with clear headings and context-rich descriptions so search engines read the story behind the work. The phrase laser engraving how to can surface in phrasing as readers seek actionable insight.


0 Comments