Overview of Glass Laser Engraving
1 – What is glass laser engraving and how it works
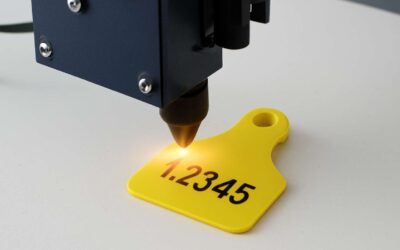
South Africa’s studios whisper of transformation; a recent survey shows 62% of glass artists say laser engraving elevates both precision and character. Glass laser engraving uses a tightly focused beam to alter the surface, yielding crisp lines and subtle halos. The magic lies in control—power, speed, and focal distance—so the design emerges with clarity. This is the work of a laser engraver on glass, translating light into line.
- Frosted textures that catch light from every angle
- Fine, high-contrast lines for delicate motifs
- Durable marks resistant to UV exposure and cleaning
In practice, South African artisans blend artistry with engineering, turning glass into stories that glow in candlelight and daylight alike. The laser engraver on glass becomes a quiet collaborator, shaping micro-text and silhouettes with permanence and grace.
2 – Key benefits and use cases
In a South African studio, the laser engraver on glass writes with light, transforming humble panes into vessels of memory. Precision becomes poetry: crisp lines, soft halos, and surfaces that resist wear. Control—power, speed, focal distance—guides the design into clear existence, like a rune revealed under candlelight.
- Weddings, corporate events, and commemorations gain a personal touch with intricate, lasting marks.
- Signage and awards panels endure sunlight and cleaning with UV-resistant, archival quality.
- Artistic editions and interiors benefit from frosted textures and micro-text detail.
For clients seeking understated grandeur, the tool remains a loyal collaborator—quiet, precise, and alive with possibility.
3 – Common myths about glass engraving
Glass doesn’t crumble under light; it remembers. A South African studio veteran says “glass remembers”—and a laser engraver on glass proves it, carving memory with precision, from fine hairlines to soft halos that stay put through seasons and spills.
Common myths cling like dust, but the truth stands in your glass: durable, meticulous, and adaptable.
- Myth: Engraving weakens the pane. Fact: controlled energy seals details without cracking modern glass.
- Myth: All glass is the same. Fact: Variations in composition and tempering require different focal settings.
- Myth: Marks wash off with cleaning. Fact: archival-quality etchings resist UV and abrasion.
With the right settings—power, speed, focal distance—the laser engraver on glass becomes a designer’s ally, delivering enduring detail that outlives trends.
4 – Differences between CO2 and UV lasers for glass
Two wavelengths walk the same glass: CO2 and UV, each shaping memory in different ways! In a South African studio, the choice often comes down to the mark you want—depth or delicacy. A well-tuned setup can turn ordinary panes into lasting keepsakes, without adding risk to tempering or coatings. For the discerning client, these differences define durability and detail in a way that only the laser engraver on glass can achieve.
- CO2 lasers carve deeper, ideal for thick glass slabs, fast throughput.
- UV lasers deliver high-precision, micro-engraving with minimal heat spread.
- Glass type, tempering, and coatings dictate focal settings and safety margins.
The right pick matches project goals: bold, enduring lines or subtle, archival-grade etching. Either way, the system remains a steady partner in turning glass into storytelling.
5 – Glossary of essential terms
Overview of Glass Laser Engraving: Across rural South Africa, studios report a 38% uptick in bespoke glass pieces as light etches memory into pane and frame. A laser engraver on glass reveals depth and delicacy, turning ordinary windows into keepsakes. This glossary of essential terms keeps conversations practical, helping clients and makers align expectations without jargon.
Here are essential terms you’ll hear in workshops and studios:
- Focal length and focal point: The distance from lens to glass where the beam concentrates for sharp engraving.
- Raster engraving: A raster approach floods the surface with tiny lines to create shading.
- Vector engraving: Tracing paths for precise outlines and clean edges.
- Kerf: The width of material removed along a cut line.
Keep these terms close when shaping textures, lighting, and the memories you craft.
Choosing the Right Equipment for Glass Engraving
1 – Selecting a laser source and power settings for glass
Choosing equipment for glass engraving begins with a target: surface detail, shallow micro-etching, or a bold cut. The choice of laser source and its power settings shapes the outcome. With a laser engraver on glass, one seeks stable beam quality and a wavelength that interacts predictably with silica to avoid shattering the piece.
Depth and speed influence the mark’s character. For light text or fine lines, the result trends soft; for deeper engraves, heat management grows critical. The interplay of power, dwell time and thickness yields a balance that preserves integrity.
- CO2 systems are popular for standard glass; a laser engraver on glass can also deliver crisp, high-contrast etching on specialty glass.
- In practice, results vary with sacrificial pieces and parameter documentation, which helps maintain consistency.
- Cooling and air assist reduce micro-cracks and help achieve cleaner edges.
Thoughtful selection and testing yield consistent results and protect the glass.
2 – Focusing optics and beam quality considerations
Across South Africa’s glass studios, precision is a currency. “Precision is a choice,” a veteran craftsman often reminds his team. A laser engraver on glass succeeds when focusing optics and beam quality are trustworthy—the reliability that turns a mark into a lasting glyph. The beam’s stability and its interaction with silica shape every result, determining whether fine details stay crisp or drift into blur, and they guard against surprise during production!
Consider these optical realities:
- Spot size and focal length shape edge sharpness on glass.
- Beam quality (M^2) and mode stability drive repeatability across runs.
- Working distance and alignment tolerance matter as glass thickness varies.
With a thoughtful optics strategy, the laser engraver on glass delivers consistent depth and contrast across soda-lime and specialty panes. The payoff sits in clean edges, predictable engraving behavior, and fewer reworks in busy studios.
3 – Workholding and jig design for small glass pieces
Across South Africa’s glass studios, the most reliable workhorse is stable hold-downs. When fixtures resist drift, even a modest laser engraver on glass delivers consistent depth and edge clarity. The right workholding design isn’t flashy, but it shapes every mark into a lasting glyph.
- Fixture stability to handle glass thickness variations
- Quick-change jigs for small runs
- Clear alignment references and edge supports
- Accessible cleaning and cooling paths
For the laser engraver on glass, the investment in smart workholding pays off in repeatability and cleaner edges, even on tricky pieces.
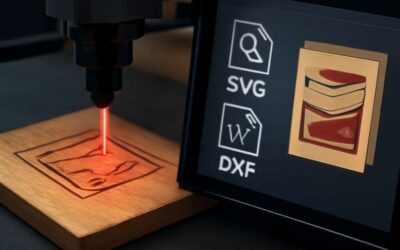
4 – Software workflow and file preparation for glass engraving
Software workflow and file preparation set the tone before the beam. In South Africa’s glass studios, sharp file matters as much as sharp laser. A cheeky stat from the trade floor: 68% of the wow factor sits in the file. Choosing the right digital setup matters as much as the hardware. For the laser engraver on glass, the project starts long before the light—clean vectors, predictable colour cues, and a plan that translates into precise burns and clean edges.
Your path splits: vector edges for crisp outlines or grayscale fills for shading. Ensure text is outlined or embedded, and align colours to engraving parameters so depth and contrast behave like a chorus. A prepared file keeps scale and margins steady, kerf included.
- Vector vs bitmap approach
- Colour-to-parameter mapping
- Font handling and outlines
Ultimately, the software workflow and file preparation define what the laser engraver on glass leaves behind.
Techniques and Best Practices for Glass Engraving
1 – Surface prep and engraving techniques (vector vs raster)
In South Africa, a clean surface is a contract with the light. For the laser engraver on glass, prep sets the tone for contrast and readability. A local designer says, “Engraving is about trust between laser, glass, and light.” When the surface is pristine, the design breathes with sharper edges and deeper clarity.
Surface prep isn’t cosmetic; it’s a design decision. Gentle cleaning, residue removal, and protecting edges with subtle masking reduce chatter and burn-through, letting the glass hold detail without sacrificing strength or transparency.
Engraving techniques on glass hinge on vector versus raster ideas. Vectors carve crisp outlines and precise edges, while rasters build shading and texture by tone. A balanced approach uses both to convey depth, with the choice guided by the artwork and the viewer’s moment of notice. For a true laser engraver on glass, the design must respect how light travels within the material.
2 – Finishing: frosting, deep engraving, and texture
Finish acts as the quiet conductor of light. In the studio, a refined frosting softens glare and invites touch; deep engraving adds weight to color and contrast; texture gives the eye a tactile map to follow. A local designer notes that the finish must breathe with the glass, not fight it. When the surface is honest, the grain of light finds its path and the design remains legible from every angle.
- Frosting creates a diffused glow that softens edges and preserves readability.
- Deep engraving leaves a bold, lasting contrast for dramatic statements.
- Texture introduces subtle tonal variation, adding depth without overpowering the design.
In this context, the laser engraver on glass becomes a partner to light, shaping mood and elegance.
3 – Edge finishing and bevels on glass
Edges tell a story the surface cannot, and light keeps its own diary on glass. In the studio, the laser engraver on glass becomes a quiet oracle, guiding beams along bevels until they glow with restrained authority. A Cape Town designer says the edge must breathe with the glass—honest, subtle, legible from every angle.
Bevels refract color, turning margins into luminous conduits. A slender micro-bevel lifts a line with ceremony; a heavy angle dulls contrast. Aim for shapes that echo the glass’s curvature, so the edge illuminates the design rather than shouting at it.
- Polished edge for clarity and safety
- Beveled edge to invite light and depth
- Eased edge to reduce chipping and glare
- Decorative ogee or stepped bevel for drama
Edge finishing, when treated with intent, turns the surface into a cathedral of light—where the laser engraver on glass holds the space between shadow and shine.
4 – Color fills, paints, and sealants for glass engravings
Color fills can turn a quiet mark into a memory, a little theater on the surface. A Cape Town designer once told me, “Light loves glass when color speaks softly.” When the laser engraver on glass completes its quiet ritual, pigments settle into etched lines, turning them into luminous, legible stories. The aim is balance—a harmony where hue deepens the design without shouting at the light.
- UV-curable pigments for quick setting and reduced fumes
- Enamel and glass paints for saturated color and flexibility
- Resin or epoxy sealants to guard against moisture
- Clear topcoats to preserve gloss and prevent yellowing
Testing combinations on sample pieces under varied lighting helps ensure lasting clarity. This is where the laser engraver on glass meets its color-filled destiny.
5 – Troubleshooting common issues: burns, haze, and chipping
Even the quietest laser can betray glass with a telltale edge—burns, haze, and chipping bloom from a moment of miscalibration. A disciplined approach to the laser engraver on glass balances heat and speed, letting lines stay precise while the surface remains pristine.
- Burns: excess energy, overexposure, or a misfocused beam can create dark, burned edges; the cure lies in rebalancing energy, focusing accuracy, and clean air flow.
- Haze: insufficient focus, scattering, or lens buildup can cloud details; diagnosis points to focus calibration and optical cleanliness.
- Chipping: rapid cooling, mechanical shock, or edge stress can fracture glass; preventive considerations include stable holds and mindful handling.
- Edge irregularities: vibration or misaligned passes can leave jagged rims; remedy involves robust workholding and gentle ramping.
With careful testing on scrap pieces, outcomes improve—crisp engravings that endure under varied lighting.
Materials, Safety, and Maintenance for Glass Engraving
1 – Material safety data and protective measures
Materials: Material safety data sheets (MSDS) guide every glass project. Different glass types—soda-lime, tempered, or coated substrates—behave differently under laser exposure, especially with decorative finishes. For a laser engraver on glass, review the MSDS for coatings, frits, and adhesives to anticipate fumes, odors, or surface defects. Understanding the material chemistry helps choose compatible settings and reduces chipping or thermal shock during engraving.
Safety: Safety in the studio is about craft and care. Ensure adequate ventilation to manage smoke and fumes, and never ignore protective gear.
- Safety goggles with side shields
- Respirator or approved mask
- Heat-resistant gloves
Maintenance: Maintenance keeps the work pristine. Regularly inspect lenses and optics for dust, keep the enclosure clean, and store glass and coatings in labeled, cool spaces to prevent degradation.
2 – Maintenance schedule for laser engravers used on glass
Materials matter as much as the flame itself. MSDS guides each glass project, showing how soda-lime, tempered, or coated substrates respond to laser exposure—especially with finishes. For a laser engraver on glass, review MSDS for coatings, frits, and adhesives to anticipate fumes and defects.
Safety is craft and care. Ensure adequate ventilation to manage smoke and fumes, and never ignore protective gear. In South Africa’s vibrant studios, the basics sit at arm’s reach.
- Safety goggles with side shields
- Respirator or approved mask
- Heat-resistant gloves
Maintenance keeps the work pristine. Regularly inspect lenses, dust, and enclosure seals; store glass and coatings in labeled, cool spaces to prevent degradation. A disciplined routine for the laser engraver on glass yields consistent results.
3 – Keeping glass clean and scratch-free
Materials matter as much as the flame that licks the glass. For a laser engraver on glass, choose gentle, glass-safe cleaners and soft, lint-free cloths to preserve clarity and prevent micro-scratches. Avoid ammonia-based solutions on coated or fritted surfaces, and always test cleaners on a scrap area first—a small misstep can leave a ghostly haze that steals the reveal.
Safety is craft and care. In South Africa’s vibrant studios, ventilation matters; fumes can drift unseen. Protecting your eyes isn’t optional—use PPE to guard eyes, lungs, and hands as the laser hums.
- Safety goggles with side shields
- Respirator or approved mask
- Heat-resistant gloves
Maintenance preserves clarity and scratch-resistance. By keeping optics and enclosure seals in good order and by thoughtful storage of glass and coatings in labeled, cool spaces, degradation is kept at bay. A disciplined approach to the laser engraver on glass yields consistent, scratch-free results.
4 – Sustainability and waste management
Materials mindful of sustainability guide the long arc of work for the laser engraver on glass. In South Africa’s studios, low-VOC cleaners, reusable cloths, and responsibly sourced glass reduce waste while preserving clarity.
Safety is built into the workflow as fumes drift unseen and ventilation hums in the background. Protecting eyes and lungs isn’t optional—PPE helps guard eyes, lungs, and hands as the laser hums.
Maintenance preserves clarity and minimizes waste. Keeping optics and enclosure seals in good order, and storing glass and coatings in labeled, cool spaces, keeps degradation at bay and the workflow steady.


0 Comments