Understanding Laser Engraving on Steel
What is laser engraving on steel
Across South Africa’s workshops, a regional survey found that 72% of manufacturers saw faster traceability after adopting laser engraving on steel. Understanding how the beam interacts with metal begins with its tightly focused energy, etching through oxides and coatings to leave a legible mark without contact. It’s a quiet revolution—labels that resist weather, grime, and time, even in mining corridors, automotive bays, and fabrication shops.
From my experience, this is where craft meets precision.
- Material response and surface finish
- Contrast, depth, and legibility under wear
- Alignment with branding and traceability needs
In the hands of skilled craftsmen, this balance between science and craft yields marks that endure as faithfully as the steel itself—truly enduring!
Benefits and applications of steel engraving
Across South Africa’s workshops, 72% of manufacturers report faster traceability after adopting laser engraving on steel. The beam’s tightly focused energy etches through oxides and coatings, leaving a crisp mark that survives weather and grime. It’s a quiet revolution—visibility that never fades in mining corridors, auto bays, or fabrication shops.
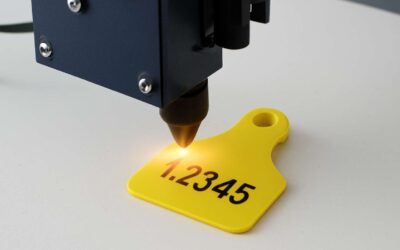
This technique finds its richest applications in mining gear, automotive assemblies, and fabricated components where coding, serials, and branding must endure. In practice, laser engraving on steel becomes a visible language of branding and traceability. Teams test marks in dust and rain, and the lines stay legible, the engravings precise—enduring!
- Enhanced durability and legibility under heavy wear
- Non-contact process preserves metallurgy and surface integrity
- Space-efficient branding and traceability that resists grime
In the hands of craftsmen, the balance between science and artistry yields marks that remain faithful to the steel itself—truly enduring!
How laser engraving works on steel
Understanding laser engraving on steel starts with a simple idea: a focused beam converts a tiny patch of metal into a permanent beacon. In practical terms, marks are created by heating and oxidising the surface, which locks the pattern into the metal long after the workshop lights fade.
Most steel marks in South Africa come from fiber lasers, which deliver tight beams without contact. The trick is controlling power, speed, and focus so the oxide layer darkens without pitting the base metal. The result is crisp, corrosion-resistant characters that stay legible through dust and rain.
- Beam quality and wavelength
- Material surface condition and coatings
- Mark durability under wear and weather
In the end, understanding this process helps teams choose the right equipment and set expectations for long-lasting branding and traceability.
Common steel grades for engraving
“The iron remembers,” my mentor would say, and in South African workshops that memory is sealed with a precise beam—laser engraving on steel—turning plain metal into a lasting emblem. Marks are born from heat and oxide, then locked into the surface, resistant to dust, rain, and the roughness of daily duty.
Common steel grades for engraving include mild steels such as S235JR and A36, carbon steels like 1018 and 1020, and stainless steels such as 304 and 316. Each grade invites a different heat-oxidation response, shaping contrast and longevity.
- S235JR / A36 mild steel
- 1018 / 1020 carbon steel
- 304 / 316 stainless steel
- D2 / H13 tool steels
In SA workshops, the choice between these families isn’t just about strength—it tells a story of reliability, local supply, and the mark’s battle with weather.
Safety and regulatory considerations for laser engraving on steel
In SA workshops, the spark is cheap, the cleanup expensive, and safety is the real test. Understanding laser engraving on steel safety and regulatory considerations is the pro’s first line of defence—and the reason your weatherproof mark survives the rain and the bustle of the shop.
Fume control, enclosure, and PPE are non-negotiables. Steel oxidation creates oxide smoke; capture it with a proper exhaust and filtration system, and shield eyes with laser-rated goggles. A fire risk lurks when hot slag meets coatings—have a dry extinguisher and a plan in place.
Regulatory wise, SA workplaces rely on OHSA and equipment checks. For many shops, this craft is risk management as artistry. Training and a dedicated laser safety officer keep things legal.
Laser Technologies and Setup for Steel Engraving
Choosing the right laser technology for steel (fiber vs CO2 vs diode)
Across South Africa’s manufacturing floor, precision trumps price every time. When you choose the right laser approach, a small object becomes a lasting mark, and waste drops. laser engraving on steel carries that promise, and the result is clean, legible, and repeatable.
Fiber lasers are favored for steel for fast, high-contrast marks; CO2 lasers struggle with bare steel; diode lasers offer lower upfront costs but thinner lines.
- Fiber: fast, high-contrast
- CO2: limited on steel
- Diode: cheaper, lower power
Setup essentials include precise focusing, gas assist, and stable mounting. Tune power and speed to suit steel grades, and verify edge quality before production runs.
Essential machine specs: power, speed, and frequency
South Africa’s factory floors prove precision pays the rent—throughput jumps up to 30% when laser engraving on steel is dialed to the task. The marks must be crisp, legible, and repeatable, turning a small component into a lasting signature while waste takes a hike.
Power dictates depth and contrast; speed governs throughput without sacrificing edge quality; frequency tunes heat input for clean lines and repeatable results. Setup essentials include precise focusing, gas assist, and rock-solid mounting. Match these to the steel grade and surface finish, and the mark proves stubbornly permanent.
- Power: depth and legibility
- Speed: throughput and edge integrity
- Frequency: heat control and repeatability
That trifecta makes the process a dependable fixture on any South African shop floor.
Dealing with reflective steel surfaces
Reflective steel surfaces pose a sly challenge; a dazzling beam can blur if the setup isn’t exact. In laser engraving on steel, surface reflectivity and oxide layers demand calculated focus and rhythm, not brute power alone.
Modern fiber and diode systems offer precision, yet reflective steel rewards balance: stable focus, controlled heat, and clean edges. The practice of laser engraving on steel becomes less about brute energy and more about disciplined beam choreography.
To navigate these waters, here are essentials that stay reliable:
- Beam quality and focal stability
- Gas assist to damp back reflections
- Rigid fixturing for repeatable placement
On South Africa’s factory floors, precision and poise matter; enduring marks come from surfaces that respect reflectivity and durability.
Focus, beam quality, and calibration
Steel doesn’t forgive sloppy focus. In laser engraving on steel, modern fiber and diode systems succeed through stable beam quality and meticulous calibration rather than brute power. When the focus stays true and the pulse rhythm matches the surface, edges stay clean and depths stay consistent.
Consider these essentials:
- Beam quality and focal stability
- Gas assist to damp back reflections
- Rigid fixturing for repeatable placement
On South Africa’s factory floors, steady calibration and disciplined beam choreography shape enduring marks. Stability in focus and predictability in motion translate to faster throughput and fewer reworks, all while keeping the metal’s oxide layer in respectful balance. A calm, repeatable setup is the quiet backbone of quality.
Accessories and safety gear for steel engraving
In South Africa’s quiet factories, a single beam writes on steel—the night becomes text, and the metal remembers. Laser engraving on steel is less about brute force and more about an iron will to align, to breathe, to matter. “The sharpest edge is forged in stillness,” a craftsman’s whisper, and the line between art and accuracy sits razor-thin.
The true backbone is laser technologies and setup for steel engraving accessories: a sturdy vise, a shielded enclosure, and vibration-quieting mounts; plus safety gear that lets hands stay calm: impact gloves and ANSI-rated eyewear.
- Protective eyewear suitable for the wavelength
- Impact-resistant gloves and protective sleeves
- Enclosed, fume-controlled work area
On South Africa’s factory floors, a calm, repeatable setup stands as the quiet backbone of enduring marks.
Design and Preparation for Steel Engraving
Vector vs raster engraving on steel
Here’s the rub: steel doesn’t forgive fuzzy lines. In laser engraving on steel, the first cut happens in the design file, not the machine. A clean vector path yields razor-sharp edges for logos and text; a busy raster can blur your message faster than a Southern African heatwave!
Design choice is the compass when you decide between vector and raster for steel—each has a personality, and your final piece will mirror that. To keep flow and readability intact, think about how edges, spaces, and contrast translate from screen to metal.
- Vector: crisp edges and legible typography.
- Raster: subtle shading and texture for depth.
- Contrast and line weight considerations when preparing files.
Preparation matters more than it looks: match the artwork to the engraver’s constraints, protect legibility, and respect the metal’s temperament. Do that, and the result will endure sunlight, workshop chatter, and South Africa’s exacting standards.
Surface preparation and finishing options
Surface discipline is the quiet engine of success in laser engraving on steel. A clean, well-prepped base can improve edge fidelity by up to 20%—that’s a stat worth chewing over. In a climate like South Africa’s, prep becomes survival, not luxury.
When you choose design intent, it travels from screen to metal through preparation and finishing. The look you want—razor edges for logos, subtle texture for depth—depends on how you treat the surface before the laser even hums. In practice, surface prep sets the stage for laser engraving on steel to meet the brief.
- Clear protective sealant for UV resistance
- Powder coating in color or matte finish
- Satin or brushed metal finish to reduce glare
- Patina or oxide contrasts for depth and character
In the end, surface prep and finishing choose the tone of the mark.
Pre-treatment, coatings, and masking techniques
Design intent travels from concept to steel through pre-treatment, coatings, and masking. The surface becomes a quiet partner, setting tone before a single beam touches metal. In the realm of laser engraving on steel, a disciplined pre-treatment can sharpen edge fidelity and deepen contrast, turning ordinary metal into a living canvas that resists wear in harsh South African environments.
Pre-treatment primes adhesion, minimizes heat-affected zones, and stabilizes micro-texture, while coatings add UV resistance and tonal modulation without altering geometry. Masking techniques shield areas not meant to engrave, preserving lines and textures with elegant precision. Consider these common approaches:
- Vinyl masks for sharp, temporary delineation
- Low-tack tapes to protect edges during engraving
- Heat-resistant masking films for complex geometries
Together, design and preparation determine whether the final mark exudes subtlety or bold character—the design’s promise kept from screen to steel long after the laser hums away.
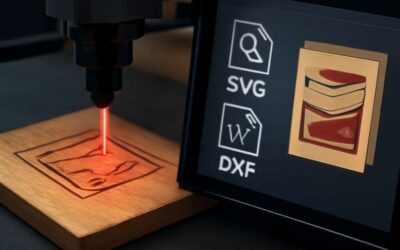
File formats and design tips for steel engraving
In South African workshops, precision begins the moment the file leaves the designer’s desk—because 68% of misalignments trace back to file prep. For laser engraving on steel, the journey from concept to mark hinges on clean, scalable files and practical formats that talk to the machine, not the operator. A well-prepped file shaves setup time and improves edge fidelity on tough alloys.
File formats and design considerations matter. Use vector-based sources and convert all text to outlines before sending to the engraver. Below are formats that keep lines crisp and contours faithful:
- AI, SVG, EPS, PDF (vector formats)
- DWG or DXF for mechanical designs
- PNG or TIFF (rasters) for reference guides
Design tips: keep shapes bold, high contrast, and kerf aware; avoid ultra-fine details that vanish under heat or vibration. With careful preparation, this approach reveals clarity that stands up to wear and speaks with quiet character.
Color mapping and grayscale effects on steel
Color mapping in laser engraving on steel is not about color so much as tonal storytelling. In workshop light, grayscale governs depth, where bold silhouettes anchor the eye and midtones reveal texture under heat and vibration. Planar shapes stay crisp when the design leans on high-contrast lines; color mapping translates into a tonal ladder the machine can faithfully reproduce on steel, preserving edge fidelity and legibility as the metal cools. The language of vector geometry helps the design talk to the machine, not the operator.
Grayscale effects on steel rely on deliberate contrast and a restrained shading rhythm. For laser engraving on steel, careful kerf awareness and bold line work ensure durability and legibility as the surface bears heat and wear. The result is a quiet, characterful mark.
Best Practices, Troubleshooting, and Maintenance
Optimizing engraving quality: parameters and techniques
Best Practices for optimizing engraving quality start with discipline and a surgeon’s attention to detail. For laser engraving on steel, I maintain pristine optics, secure clamps, and dial in power and speed with care. Stabilize the workpiece, monitor temperature, and treat job as sculpture waiting to emerge.
- Lens cleanliness and protective coatings
- Rigid fixturing and accurate coordinates
- Incremental testing of power, speed, and frequency
Troubleshooting steel engraving is a symphony of small adjustments. If edges appear ragged, verify focus and beam quality, then inspect the gas or air assist for consistency. If marks disappear, check file contrast and ensure the raster pass aligns with the vector outline!
Maintenance keeps the craft humming in South Africa’s workshops. Clean optics, inspect hoses, and verify cooling. Schedule routine calibration and store protective covers to shield from dust. With regular upkeep, laser engraving on steel stays precise, repeatable, and ready for the next challenge.
Common defects and corrective measures
Best practices for laser engraving on steel start with discipline: pristine optics, rigid fixturing, and a calm workshop temperature. In South Africa’s workshops, a 0.1 mm focus drift can ruin a line; keeping lenses clean and clamps tight preserves edge sharpness. Treat every job like sculpture waiting to emerge, with care in every setup and measure of patience!
Troubleshooting is a symphony of small adjustments. Ragged edges often point to focus and beam quality variations; a close look at the gas/air assist for consistency helps. When marks vanish, file contrast and raster alignment matter.
Maintenance keeps the craft humming. Clean optics, check hoses, and monitor cooling. Routine calibration and protective covers shield from dust. Common defects—dust halos, drift, and heat distortion—respond to timely upkeep and thoughtful parts replacement.
Post-engraving finishing and protective coatings
Best practices after engraving on steel revolve around preserving edge integrity and protecting the finish. In South Africa’s workshops, a stable climate, clean surfaces, and compatible protective coatings keep the contrast sharp and corrosion resistance high. The truth about laser engraving on steel is that the post-process layer defines long-term value as much as the cut itself.
Troubleshooting post-engraving finishes is a patient audit. If a coating yellows or delaminates, the issue is often compatibility and cure behavior rather than the engraving itself. When marks seem to fade, observe how the coating interacts with steel and adjust expectations for color and texture accordingly.
Maintenance sustains the craft. Regular inspection, light cleaning, and timely reapplication of protective layers protect investments in steel parts. This routine discipline mirrors practical SA realities, where climate and dust demand vigilant upkeep for a lasting, professional finish.
Routine maintenance and system longevity
Best Practices in South Africa’s workshops begin with a stable climate, clean surfaces, and material compatibility that keeps color and detail faithful through time. For laser engraving on steel, careful prep and consistent consumables convert raw metal into a lasting, professional impression—as if the forge itself sighs.
Troubleshooting post-engraving finishes is a patient audit. If the finish yellows or delaminates, the issue often lies with compatibility and cure behavior rather than the engraving itself. Observe how the film interacts with the steel and adjust expectations accordingly.
Maintenance sustains the craft. Regular inspection, gentle cleaning, and timely reapplication of protective layers protect investments in steel parts. This routine fits SA realities, where dust and climate demand vigilance to ensure lasting, professional finishes. This routine also suits laser engraving on steel.
ROI considerations and cost-saving tips for steel engraving
Across SA workshops, disciplined setup and parameter standardization yield ROI in laser engraving on steel—fewer reworks, faster turnarounds, and steadier color fidelity. Best practices hinge on clean benches, traceable design libraries, and consistent consumables. When material batches and coatings stay aligned, the finish remains faithful, job after job.
Troubleshooting post-engraving finishes is a patient audit. If the finish yellows or delaminates, the issue often lies with compatibility and cure behavior rather than the engraving itself. Observe how the film interacts with the steel and adjust expectations for laser engraving on steel.
Maintenance sustains the craft and ROI. Regular inspection and gentle cleaning, plus timely reapplication of protective layers, guard investments in steel parts against corrosion and wear. In South Africa’s dusty climate, this cycle lowers downtime and stretches equipment life. Cost-saving ideas come from life-cycle thinking.


0 Comments