
Understanding Laser Engraving Technologies
Types of Laser Engravers – CO2 vs Fiber Laser Engravers
Laser engraving technology has evolved rapidly, offering a variety of options tailored to different needs. A laser engraver with Klipper firmware simplifies the process, providing precise control and customisation. When choosing the right machine, understanding the differences between CO2 and fibre laser engravers is crucial.
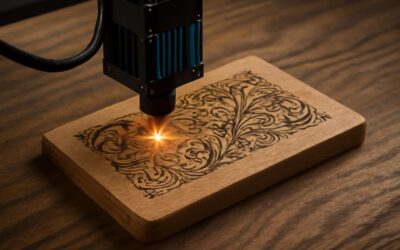
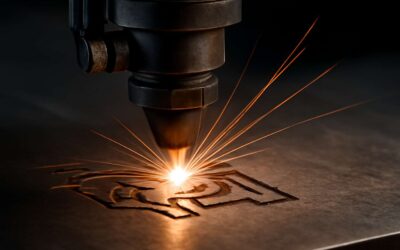
CO2 laser engravers are popular for working on organic materials like wood, acrylic, and leather. They excel at producing intricate, detailed designs with smooth finishes. Conversely, fibre laser engravers are better suited for metals such as stainless steel and aluminium. Their high power density allows for faster engraving and marking, making them ideal for industrial applications.
Key distinctions include:
- CO2 laser engravers often operate at wavelengths around 10.6 microns, perfect for non-metal materials.
- Fibre laser engravers use shorter wavelengths, typically around 1.06 microns, enabling precise metal marking.
- The integration of Klipper firmware with these systems enhances performance, offering customisable control and automation.
Choosing between these types depends on your project scope, material focus, and desired finish. A laser engraver with Klipper can adapt to either, providing a versatile platform for creative and professional engraving tasks.
Key Components of a Laser Engraver – Laser Tube, Stepper Motors, Control Board
Understanding the core components of a laser engraver with Klipper is essential if you want to harness its full potential. At the heart of the system lies the laser tube, which generates the beam necessary for engraving. The quality and power of the laser tube directly influence the precision and depth of your designs. Reliable stepper motors are equally crucial—they control the movement of the laser head with remarkable accuracy, ensuring your intricate patterns come out exactly as intended.
The control board acts as the brain of your laser engraver with Klipper, translating your digital designs into precise motor movements. It manages everything from laser power to axis positioning. Integrating Klipper firmware with these components optimises their performance, providing enhanced control and automation.
- High-performance laser tube
- Accurate stepper motors
- Robust control board
Together, these key elements create a harmonious system capable of delivering professional-grade results, whether you’re working with wood, metal, or acrylic. Ultimately, understanding these components helps you make informed decisions, ensuring your investment in a laser engraver with Klipper pays off in flawless craftsmanship.
Applications and Materials Suitable for Laser Engraving – Wood, Acrylic, Metal, Leather
Laser engraving technology has revolutionised the creation of personalised and intricate designs across various materials. The precision of a laser engraver with Klipper unlocks new realms of craftsmanship, making even the most complex patterns achievable. But to truly harness its potential, understanding the types of materials suitable for laser engraving is vital. From delicate wood grains to sleek acrylic sheets, each medium demands different laser settings and techniques.
Materials such as wood, acrylic, metal, and leather respond uniquely to laser engraving. For instance, wood provides a warm, natural aesthetic that’s perfect for personalised gifts, while acrylic offers a glossy finish ideal for signage and decorative pieces. Metal, often requiring specialised laser sources like fibre lasers, can be engraved with high contrast and durability. Leather, with its organic texture, lends itself beautifully to customised accessories and artwork.
Engraving on these diverse materials with a laser engraver with Klipper involves precise calibration, but once mastered, it opens endless creative possibilities. Whether you’re etching intricate patterns into wood or adding detailed designs to leather, understanding material compatibility ensures flawless results every time. This synergy between laser technology and materials transforms mere ideas into stunning, tangible creations that captivate and inspire.
Introduction to Klipper Firmware
What is Klipper? – Overview of Klipper Firmware
In the realm of modern fabrication, precision and efficiency are paramount. Enter Klipper firmware—a revolutionary digital conductor orchestrating the symphony of a laser engraver with Klipper. This open-source firmware transforms traditional machine control, offering unprecedented speed and accuracy, elevating laser engraving to new heights of artistry and craftsmanship.
Klipper’s innovative approach harnesses the power of a microcontroller combined with a host computer, allowing for refined control over the laser engraver with Klipper. Its architecture simplifies complex movements and speeds up processing, reducing lag and enhancing detail. For those passionate about pushing creative boundaries, Klipper’s customisable features enable seamless integration, making it a favourite among advanced hobbyists and professionals alike.
- Enhanced speed
- Superior precision
- Customisable workflows
- Robust community support
By leveraging Klipper firmware, operators can unlock the full potential of their laser engraver with Klipper, transforming raw materials into bespoke works of art with remarkable finesse. Truly, it’s a game-changer in the pursuit of craftsmanship excellence.
Features and Benefits – High Performance, Easy Configuration, Enhanced Precision
Imagine a laser engraver with Klipper that operates with a level of performance once thought impossible. This cutting-edge firmware empowers your machine to push beyond conventional limits, delivering faster processing and unparalleled control. Klipper’s innovative architecture leverages the combined strength of microcontrollers and host computers, creating a seamless symphony of motion that feels almost intuitive.
One of Klipper’s standout features is its ease of configuration. Advanced users appreciate the straightforward setup process, which simplifies complex calibration routines and allows rapid customisation. Its flexible design means you can fine-tune every aspect of your laser engraver with Klipper, ensuring optimal results for diverse materials like wood, acrylic, or metal.
Enhanced precision is the hallmark of this firmware. By optimising stepper motor commands and reducing lag, Klipper transforms your laser engraver into a tool of exquisite detail. Whether engraving delicate patterns or intricate designs, you’ll notice significantly sharper edges and cleaner finishes. For those passionate about craftsmanship, the combination of high performance, ease of use, and superior accuracy makes Klipper an essential upgrade for any laser engraver.
Compatibility with 3D Printers and CNC Devices – Expanding to Laser Engravers
In the realm of digital craftsmanship, the versatility of firmware like Klipper has revolutionised the landscape of laser engraving, 3D printing, and CNC machining. Originally crafted to unlock the full potential of 3D printers, Klipper’s compatibility extends seamlessly into the world of laser engravers, transforming these machines into marvels of precision and speed. Its architecture, which harnesses the combined power of microcontrollers and host computers, creates an almost poetic harmony of motion and control—making the impossible, possible.
For those contemplating the leap from traditional control systems, understanding the compatibility of a laser engraver with Klipper opens a universe of possibilities. This firmware’s adaptability means it can be integrated with a variety of control boards typically used in laser engraving devices. Whether working with open-source hardware or custom setups, Klipper’s modular design ensures that your laser engraver operates at peak performance, with enhanced flexibility and ease of configuration.
- Advanced microcontroller support
- Customisable firmware settings
- Robust community-driven updates
Such features make the laser engraver with Klipper not just a tool, but an extension of your creative vision. Its compatibility with various devices ensures that both hobbyists and professionals can elevate their craft, embracing the technological symphony that Klipper orchestrates with finesse. The fusion of innovative firmware and versatile hardware heralds a new era for laser engraving, where precision meets performance in an elegant dance of light and craftsmanship.
Integrating Klipper Firmware with Laser Engravers
Hardware Requirements – Supported Microcontrollers, Stepper Drivers
Integrating Klipper firmware with a laser engraver with Klipper isn’t just about software—it’s about unlocking a new realm of precision and control. The backbone of this integration lies in selecting compatible hardware components, primarily microcontrollers and stepper drivers, that can handle the high demands of laser engraving. A robust microcontroller, such as the STM32 or Raspberry Pi, forms the core of a reliable setup, offering the processing power needed for intricate designs. Meanwhile, stepper drivers like the TMC series are crucial—they provide smooth, silent operation and fine control over motor movements, ensuring your laser engraver with Klipper performs at peak precision.
Supported microcontrollers are pivotal, with the most common options including:
- STM32 microcontrollers
- Raspberry Pi boards
When selecting stepper drivers, look for features such as microstepping capabilities and thermal management to prevent overheating. Properly matching these components guarantees a seamless, efficient workflow—transforming your laser engraver with Klipper into a powerhouse of accuracy and reliability. Without the right hardware, even the most advanced firmware can’t reach its true potential, making hardware compatibility the foundation of successful integration.
Software Setup – Installing Klipper Firmware on Your Controller
Embarking on the journey to integrate Klipper firmware with your laser engraver with Klipper is akin to unlocking a portal to unparalleled mastery over precision. The process begins with the meticulous installation of the firmware onto your chosen microcontroller—an act that transforms your device into a conduit of flawless control. This step, often underestimated, sets the foundation for a seamless symphony of movements and laser pulses that breathe life into your designs.
For optimal performance, it’s essential to select hardware components that harmonise with Klipper’s sophisticated architecture. Microcontrollers such as the STM32 series or a Raspberry Pi deliver the processing prowess needed to orchestrate intricate engravings. Complementing these are stepper drivers—especially those from the TMC series—that facilitate whisper-quiet, microstepping precision. Their thermal management capabilities safeguard against overheating, preserving both the integrity of your hardware and the accuracy of your work.
When installing Klipper firmware on your controller, consider the following sequence:
- Connect the microcontroller to your computer via USB or other compatible interfaces.
- Download the latest version of Klipper firmware from the official repository.
- Configure the firmware settings to match your laser engraver with Klipper hardware specifications.
- Use a flashing tool to upload the firmware onto your microcontroller, ensuring a secure and complete installation.
- Perform initial calibration and test runs to fine-tune the system’s responsiveness and accuracy.
This process, though technical, unleashes a new realm of control and customization, elevating your laser engraving projects to extraordinary heights. Once installed, Klipper’s high-performance capabilities seamlessly integrate with your hardware, transforming your laser engraver with Klipper into a precision instrument capable of delivering stunning, detailed results every time.
Configuration Files – Configuring for Laser Engraving Machines
Integrating Klipper firmware with your laser engraver with Klipper is a delicate act of harmony—an orchestration of software and hardware that opens the door to unparalleled engraving precision. Configuring the firmware files requires a meticulous eye, one that understands the subtle nuances of laser control and movement. This process isn’t merely about inputting settings; it’s about crafting a digital blueprint that aligns flawlessly with your machine’s unique characteristics.
To tailor your laser engraver with Klipper, you’ll need to modify the configuration files with parameters like laser power, stepper motor calibration, and axis limits. These details transform generic code into a personalised command centre. Often, this involves an initial setup where you define your hardware specifics, such as stepper motor steps per millimetre and maximum feed rates. Such precision ensures your laser pulses are in perfect synchrony with the movement of the machine, creating crisp, detailed engravings every time.
In practice, many users adopt a systematic approach: first, setting up the core configuration, then gradually refining it through test runs.
- Adjust laser power settings for optimal engraving depth.
- Calibrate stepper motor currents for smooth motion.
- Configure safety parameters to prevent overexposure or hardware stress.
These steps forge a seamless integration, where Klipper’s high-performance capabilities elevate your laser engraver with Klipper to a new realm of artistic mastery and technical excellence. As the configuration solidifies, your machine becomes an extension of your vision, executing each design with relentless precision and unwavering fidelity.
Hardware Modifications – Ensuring Compatibility and Safety
Integrating Klipper firmware with your laser engraver with Klipper demands more than just uploading software; it requires a delicate dance of hardware modifications to ensure seamless compatibility and safety. Every component must harmonise like a symphony—each part playing its role without discord. The process begins with a thorough assessment of your machine’s hardware, ensuring that the microcontroller and stepper drivers can handle the precision and power Klipper offers. Safety features become paramount, especially when dealing with high-powered lasers, to prevent overexposure or accidental hardware damage.
To achieve this, you might consider installing dedicated safety modules or interlock systems that automatically shut down the laser in case of anomalies. The careful calibration of stepper motors, alongside the integration of appropriate power supplies, creates a foundation where laser pulses and mechanical movement move in perfect synchrony. Often, a systematic approach is adopted, where:
- Hardware compatibility is verified first
- Necessary modifications are made to the control board
- Safety protocols are embedded into the system
This meticulous preparation transforms your setup into a reliable, high-performance laser engraver with Klipper, ready to bring intricate designs to life with unwavering fidelity. When done correctly, these modifications elevate your machine from a simple engraver to a marvel of technological artistry, ensuring both safety and exceptional engraving quality.
Advantages of Using Klipper with Laser Engravers
Enhanced Precision and Speed – Faster Engraving with Better Detail
In the relentless pursuit of perfection, efficiency becomes the silent architect of innovation. A laser engraver with Klipper transforms this pursuit into an art form by dramatically enhancing precision and speed. With its firmware-driven mastery, intricate designs are rendered with astonishing clarity, capturing every nuance of the artist’s vision. The real magic lies in the ability to accelerate engraving processes without sacrificing detail, a feat that traditional controllers often struggle to achieve.
Imagine a workflow where the machine’s responsiveness is almost telepathic—where the laser’s movement is finely tuned to the tiniest command, ensuring each pass is both swift and exact. This synergy between hardware and software allows for faster engraving times, unlocking new realms of creativity and productivity. For those who demand excellence, a laser engraver with Klipper offers an elegant solution—one that marries technological sophistication with artistic integrity.
Reduced Latency and Jerk – Smoother Movements
In the realm of laser engraving, where each millimetre counts and artistry converges with precision engineering, the role of firmware cannot be overstated. A laser engraver with Klipper elevates this craftsmanship by dramatically reducing latency and jerk, resulting in movements that are as smooth as silk flowing over a polished surface. This fluidity transforms the engraving process into a ballet of mechanical grace, where the laser’s path is executed with almost balletic finesse.
Reduced latency ensures that commands are processed instantaneously, diminishing the lag between intention and action. Meanwhile, minimising jerk — the sudden, jarring shifts in movement — fosters a seamless transition between intricate details and swift passes. The result? A harmonious dance of acceleration and deceleration, capturing even the most delicate nuances of your design with unwavering clarity. For enthusiasts and professionals alike, a laser engraver with Klipper offers an enchanting blend of precision and elegance, turning each engraving into a symphony of technological artistry.
Customizability and Advanced Control – Advanced G-code Commands and Macro Support
The allure of a laser engraver with Klipper lies not only in its raw precision but in the extraordinary level of control it grants—control that feels almost like wielding a digital brush with instinctive finesse. When it comes to customisation and advanced control, Klipper opens a gateway to limitless possibilities. Its support for sophisticated G-code commands allows users to craft intricate, bespoke patterns that push the boundaries of creativity. This firmware empowers even the most demanding artisans to fine-tune every aspect of the engraving process, transforming a simple machine into an extension of their artistic vision.
One of the most compelling features of a laser engraver with Klipper is its macro support. Macros enable automation of complex sequences, reducing manual intervention and ensuring consistency across multiple projects. Whether it’s adjusting laser power for different materials or executing layered engraving routines, macros streamline workflows with elegance and precision. For enthusiasts who crave customisation, this level of advanced control is a game-changer, providing the flexibility to adapt and innovate without constraint.
- Enhanced precision through customisable parameters.
- Rapid adjustments with intuitive macro commands.
- Seamless integration with existing workflows, thanks to versatile G-code support.
In essence, a laser engraver with Klipper isn’t just a tool—it’s a canvas of endless potential. Its capacity for advanced control and customisation makes it an ideal choice for those who see beyond mere functionality, seeking instead a harmonious blend of technological mastery and artistic expression. The result is a machine that doesn’t just engrave but elevates every project into a rarefied realm of craftsmanship, where control is as profound as the artistry it produces.
Remote Management and Monitoring – Web Interfaces and Real-time Updates
Remote management and monitoring revolutionise how professionals operate their laser engraver with Klipper. With web interfaces, operators can oversee multiple machines from a single dashboard, saving time and reducing errors. Real-time updates mean changes to engraving parameters are instantly reflected, enabling seamless adjustments during a project. This capability ensures precision and consistency, especially when working on complex or large-scale projects.
The convenience of remote access allows for effortless troubleshooting and fine-tuning without halting your workflow. A laser engraver with Klipper supports versatile web-based controls, transforming traditional machine management into an intuitive experience. Whether you’re adjusting laser power or monitoring engraving progress, everything happens smoothly through a user-friendly interface.
- Instant feedback on machine status
- Remote control of engraving parameters
- Seamless integration with existing workflows
Harnessing these features elevates productivity and enhances project precision. A laser engraver with Klipper becomes more than just a tool; it’s a connected platform that empowers artisans and professionals alike to push creative boundaries effortlessly.
Setting Up a Laser Engraver with Klipper
Step-by-Step Hardware Assembly – Connecting Stepper Motors, Laser Module, and Controller
Setting up a laser engraver with Klipper transforms a humble device into a symphony of precision and speed. The journey begins with the meticulous hardware assembly—connecting stepper motors, laser modules, and the controller with a craftsman’s touch. Each component must harmonise seamlessly, like a well-rehearsed orchestra.
The stepper motors are the heartbeat of your laser engraver with Klipper, guiding the movement with unwavering accuracy. Connecting these motors involves careful wiring to the controller, ensuring that each stepper driver is optimally configured to translate signals into fluid motion. The laser module, the artist’s brush, is wired with equal care, demanding a secure connection for consistent power and control.
Once the physical connections are complete, the next step involves integrating the controller with the Klipper firmware. This firmware acts as the conductor, synchronising all hardware elements for flawless execution. With the hardware assembled, a simple but vital step is verifying the connections—making sure every wire is snug and every motor responds as commanded. This foundation sets the stage for the enchantment of high-precision laser engraving, where speed and detail dance in perfect harmony.
Firmware Installation – Flashing Klipper onto the Controller
Flashing Klipper firmware onto your controller is the pivotal step that transforms your setup from a collection of hardware into a unified, high-performance laser engraver with Klipper. This process is akin to awakening a dormant conductor, ready to orchestrate seamless, precise movements.
Begin by preparing your microcontroller—whether it’s an Arduino, Raspberry Pi, or another compatible board—ensuring it’s connected to your computer. Download the latest Klipper firmware from the official repository, a treasure trove of optimised code designed to elevate your laser engraving experience. Flashing involves transferring the firmware onto your controller through a straightforward process, often guided by flashing tools or terminal commands.
- Ensure your controller’s bootloader is intact to facilitate smooth firmware installation.
Once flashed, the firmware’s intuitive configuration files come into play, allowing you to tailor the parameters for your laser engraver with Klipper. This step is essential to harness the full potential of your device, enabling faster, more precise engravings that dance effortlessly across materials.
Configuration and Calibration – Aligning Laser Focus, Setting Limits
Setting up a laser engraver with Klipper configuration is where precision truly begins to shine. Once the firmware is correctly flashed onto your controller, the next critical step involves aligning the laser focus to ensure crisp, detailed engravings. Precision focus not only enhances the quality of your work but also prolongs the lifespan of your laser module. Achieving perfect focus often requires meticulous adjustments, using calibration tools or test patterns, to fine-tune the laser’s focal point for different materials.
To optimise the performance of your laser engraver with Klipper, it’s essential to set explicit limits—such as maximum travel distances and safety boundaries. This proactive approach prevents accidental damage and guarantees smooth, reliable operation. The process involves editing configuration files, where you specify parameters like bed size, stepper motor acceleration, and safety margins. These settings form the backbone of an efficient, high-performance machine that can deliver both speed and finesse in every engraving.
Incorporating a structured approach, consider the following steps for calibration:
- Adjust the laser’s focus to the optimal point for your material.
- Set movement limits to prevent the laser from exceeding safe boundaries.
- Test engravings at various intensities to identify the perfect balance of power and detail.
By paying close attention to these calibration details, you’re ensuring your laser engraver with Klipper operates with enhanced precision, turning every project into a masterpiece of craftsmanship and technology. Achieving this harmony between hardware and software elevates your engraving capabilities to a level where artistry meets engineering efficiency seamlessly.
Safety Precautions – Enclosure, Ventilation, Eye Protection
In the shadowed realm of precision craftsmanship, safety remains the unseen guardian of every laser engraver with Klipper. The silent hum of the laser, while alluring, conceals a potent force that demands respect. Enclosing your machine within a sturdy, fire-resistant enclosure is not merely a precaution but a necessity—shielding both operator and environment from harmful debris and stray beams. Proper ventilation, often underestimated, is equally vital; it purges toxic fumes and particles that escape during intense engraving sessions. Without these safeguards, the beauty of intricate engravings could swiftly turn into a perilous nightmare.
Equally crucial is eye protection. The laser’s radiant power, invisible to the naked eye, can inflict irreversible damage in an instant. Wearing specialised safety goggles that filter specific wavelengths ensures your vision remains intact, preserving your ability to craft masterpieces in the shadows.
To elevate safety standards, consider implementing a structured hierarchy of precautions:
- Enclose the laser engraver with robust shielding to contain stray beams.
- Ensure proper ventilation to manage fumes and airborne particulates efficiently.
- Always wear certified eye protection during operation.
In this dance of light and shadow, only vigilant safety precautions can guarantee that your journey with a laser engraver with Klipper remains both a marvel of precision and a safeguard against the unseen hazards lurking in the dark.
Software and Workflow for Laser Engraving with Klipper
Control Software Options – OctoPrint, Fluidd, Mainsail
In the shadowed realm of laser engraving, precision and control are the keys to unlocking true artistry. When wielding a laser engraver with Klipper, the software becomes the silent conductor of your creative symphony. Its seamless workflow transforms complex designs into hauntingly detailed engravings, with a fluidity that rivals the whisper of a ghostly breeze. The choice of control software can elevate your craft to spectral heights, whether through OctoPrint, Fluidd, or Mainsail—each offering a unique portal into the machine’s soul.
OctoPrint, with its hauntingly intuitive interface, grants remote access that feels almost otherworldly, while Fluidd and Mainsail provide streamlined control with a touch of gothic elegance. These interfaces enable real-time monitoring and fine-tuning, ensuring your laser engraver with klipper operates with eerie precision. The real magic lies in the customisation—advanced G-code commands and macro support allow for a bespoke workflow that’s as unique as a shadow’s dance. As you navigate this digital underworld, the software becomes your conduit to mastery, turning simple materials into artefacts of dark beauty.
Design to Engraving Workflow – Creating Designs, Slicing, Uploading G-code
Designing and preparing for laser engraving with a laser engraver with Klipper transforms creativity into a precise science. The workflow begins with crafting intricate digital designs, often through specialised vector or raster graphics software. Once the masterpiece is ready, the next step involves slicing—converting complex images into layered G-code commands that your laser engraver with Klipper can interpret with surgical accuracy. This process ensures that every detail, from delicate shading to sharp edges, is preserved during the engraving process.
Uploading G-code is a pivotal moment; it acts as the bridge between digital conception and physical realisation. Modern control software like OctoPrint, Fluidd, or Mainsail seamlessly facilitate this transfer, providing real-time feedback and control. For those seeking unparalleled customisation, advanced G-code commands and macro support within the software allow for tailoring workflows that align with specific materials and design intricacies. This level of control elevates the laser engraver with Klipper from a mere machine into an extension of artistic intent.
- Prepare your digital design, ensuring it aligns with the material’s properties and your desired outcome.
- Slice the design carefully, adjusting parameters like engraving speed and laser power for optimal results.
- Upload the generated G-code to your control software—be it OctoPrint, Fluidd, or Mainsail—for real-time management.
Throughout this process, the harmony between software and hardware becomes evident. The precision of the laser engraver with Klipper is not merely a matter of hardware quality but also the finesse embedded in your workflow—each step a brushstroke in the greater portrait of craftsmanship. In this digital age, mastery over the design-to-engraving pipeline unlocks a universe of artistic possibilities, where every project becomes a testament to technical prowess and creative vision.
Running Laser Jobs – Start, Monitor, and Adjust in Real-time
Controlling a laser engraver with Klipper isn’t just about hitting ‘start’ and watching the magic happen—it’s a dance of precision, speed, and real-time finesse. With the right software, you become the conductor of a finely-tuned symphony, guiding each movement with expert control. Modern control software like OctoPrint, Fluidd, or Mainsail transforms your laser engraver with Klipper into a digital extension of your artistic vision, offering live feedback and instant adjustments that keep your project on point. When running laser jobs, monitoring in real-time is crucial; you can tweak laser power, speed, or even pause the operation if you notice something amiss. That instant control not only safeguards your workpiece but also saves precious time—because no one wants to wait for a botched job to finish before fixing it.
For seamless operation, a few simple steps are involved: first, start the job through your preferred control software. Then, keep a watchful eye on progress—whether it’s a delicate engraving or a bold cut—using the intuitive interface. Should the need arise, adjustments can be made on the fly, thanks to the advanced control capabilities of Klipper firmware.
- Pause or stop the job if needed
- Adjust laser intensity in real-time
- Modify movement speed for finer details
This dynamic interaction ensures your project remains impeccable from start to finish. The synergy between software and hardware in a laser engraver with Klipper underscores the importance of precision, adaptability, and a touch of flair—because in the world of laser engraving, control is everything.
Optimizing Laser Engraving Performance with Klipper
Setting Proper Parameters – Laser Power, Passes, Speed
Optimising laser engraving performance with a laser engraver with Klipper hinges on precise parameter tuning. Mastering laser power, passes, and speed can unlock astonishing levels of detail and efficiency. When set correctly, these parameters reduce engraving time while enhancing the quality of each etched line, making your projects not only more beautiful but also more consistent.
Adjusting laser power is akin to fine-tuning a musical instrument—too high, and you risk overburning; too low, and the design remains faint. Passes determine how many times the laser retraces a design, allowing for deeper etching or softer shading. Meanwhile, speed controls how swiftly the laser head moves across the material, balancing detail with productivity.
For optimal results, consider starting with moderate laser power, a few passes, and a speed that matches your material’s sensitivity. Experimentation is key—small tweaks can dramatically improve your engraving quality. With a laser engraver with Klipper, you gain the ability to customise these settings down to an exact science, ensuring each project reaches its true potential and your workflow becomes a symphony of precision and speed.
Utilizing Advanced Features – Kerf Compensation, Raster vs Vector Modes
Enhancing the performance of a laser engraver with Klipper involves harnessing its advanced features to push boundaries of precision and efficiency. One such feature—kerf compensation—allows for meticulous adjustments that account for material removal width, ensuring intricate designs translate perfectly from digital files to physical engravings. This fine-tuning results in cleaner edges and more accurate details, vital for professional-grade projects.
Furthermore, understanding the choice between raster and vector modes can dramatically influence your engraving outcomes. Raster mode is ideal for photo-quality images, providing rich shading and depth, while vector mode excels in sharp lines and precise contours. Switching seamlessly between these modes, enabled by Klipper’s flexible firmware, maximises your workflow’s potential.
Integrating these capabilities transforms your laser engraver with Klipper into an extension of your creative intent—delivering stunning results that are both consistent and customisable. It’s the synergy of technology and craftsmanship that elevates your engraving projects to new heights of excellence.
Troubleshooting Common Issues – Inconsistent Engraving, Positioning Errors
Achieving flawless results with a laser engraver with Klipper can sometimes feel like chasing a fleeting shadow. Inconsistent engraving lines or subtle positioning errors can transform a masterpiece into a frustrating puzzle. These issues often stem from overlooked calibration hiccups or hardware misalignments that quietly undermine precision. Fortunately, troubleshooting these common issues can be surprisingly straightforward.
One of the most effective troubleshooting steps involves inspecting the firmware configuration. Ensuring that the stepper motor settings and axis limits are accurately calibrated will dramatically improve engraving consistency. Additionally, verifying the stability of your microcontroller connections and checking for any loose wiring can prevent erratic movements that cause misalignment.
Sometimes, the root of the problem lies in the physical setup rather than the software. For instance, uneven bed surfaces or loose belts can introduce subtle shifts during operation. An ordered approach—such as following a step-by-step hardware check—can often resolve these issues. Here’s a quick overview of the process:
- Inspect and tighten all belts and pulleys.
- Calibrate the laser focus and ensure the bed is level.
- Update firmware settings to match your hardware specifications.
- Run test engravings to identify specific inconsistencies.
When troubleshooting a laser engraver with Klipper, patience and meticulous attention to detail are key. Addressing these common issues not only enhances the quality of your engravings but also extends the lifespan of your equipment. With a little troubleshooting finesse, even the most stubborn inconsistencies can become a thing of the past, unlocking your creative potential with clarity and confidence.
Future Trends and Innovations in Laser Engraving with Klipper
Integration with Automation and Robotics – Automated Workflows
As the world hurtles into an era where automation is no longer a luxury but a necessity, laser engravers with Klipper are poised to lead the charge into unprecedented levels of efficiency and precision. Future trends suggest a fascinating convergence of laser engraving with robotics and automation, transforming once manual processes into seamless, intelligent workflows. Imagine a laser engraver with Klipper integrated into a fully automated production line—no human intervention needed, yet every detail meticulously executed.
Advancements in hardware, coupled with sophisticated software, will enable these systems to adapt dynamically to complex designs, optimise engraving parameters in real time, and even self-calibrate for varying materials. Such innovations will not only heighten productivity but also set new standards for safety and consistency. As automation and robotics become more entwined with laser engraving, expect to see a proliferation of features like automated material handling and real-time quality assurance, all driven by the reliable prowess of a laser engraver with Klipper at its core.
AI and Pattern Recognition – Enhancing Custom Designs
As the frontiers of digital artistry expand, future trends in laser engraving are poised to revolutionise the creative landscape. Innovations in artificial intelligence (AI) and pattern recognition are unlocking new dimensions of custom design, transforming intricate visions into reality with uncanny precision. A laser engraver with Klipper integrates seamlessly with these cutting-edge technologies, elevating the craft beyond traditional limitations.
Imagine a system that not only interprets complex patterns but also learns from each engraving, refining its techniques autonomously. AI-powered pattern recognition enables the laser engraver with Klipper to adapt dynamically, anticipating material responses and adjusting parameters on the fly. This intelligent feedback loop ensures consistently flawless results, even with diverse substrates like wood, acrylic, or metal.
To harness these advancements, developers are creating sophisticated algorithms that facilitate the real-time optimisation of engraving processes, ensuring each detail is rendered with exceptional clarity and speed. The future promises a landscape where design complexity is no longer constrained by manual adjustments but enhanced through machine learning and automation. Such innovations are set to redefine the boundaries of what a laser engraver with Klipper can achieve, making bespoke craftsmanship faster, smarter, and more precise than ever before.
Open Source Community Contributions – Sharing Configurations and Improvements
The future of laser engraving is unfolding rapidly, driven by a vibrant open source community committed to pushing the boundaries of what a laser engraver with Klipper can achieve. As more enthusiasts and professionals share configurations and innovative improvements, the landscape becomes a collaborative tapestry of ingenuity. This collective effort not only accelerates technological advancements but also makes high-precision engraving accessible to a wider audience.
Community-driven projects often focus on refining firmware settings, enhancing safety features, and developing custom hardware modifications. These contributions serve as a fertile ground for experimentation, allowing users to tailor their laser engravers with Klipper for specific materials or intricate design demands. The spirit of shared knowledge fosters a dynamic environment where breakthroughs happen organically, transforming hobbyist setups into sophisticated tools capable of complex, customised work.
By embracing open source contributions, users can benefit from regularly updated configuration files, optimised G-code routines, and innovative automation workflows. As the community grows, expect to see an increasing array of solutions designed to improve speed, accuracy, and safety—making the laser engraver with Klipper not just a machine, but a true extension of creative vision. This collaborative ethos promises a future where every user becomes a co-creator in the evolution of laser engraving technology.
0 Comments