
Understanding Laser Engraving on Wood
What is a Laser Engraver?
Imagine wielding a tool so precise that it can transform humble timber into a canvas of intricate artistry—welcome to the world of laser engraving on wood. A laser engraver is a marvel of modern technology, utilizing focused beams of light to carve, etch, or mark surfaces with astonishing accuracy. It’s no longer the stuff of science fiction; it’s an essential instrument for artisans and entrepreneurs alike who seek to elevate their craft.
What exactly is a laser engraver? At its core, it’s a computer-controlled device that directs a laser beam to burn or etch designs onto various materials, with wood being one of the most popular choices. Using a laser engraver on wood offers unparalleled detail and consistency, making it ideal for custom signage, personalized gifts, or even delicate art pieces.
- The process begins with creating a digital design, which the laser engraver then faithfully reproduces onto the wood surface.
- Adjustments in power and speed settings determine the depth and clarity of the engraving, allowing for a versatile range of effects.
- Because the laser can work with precision that surpasses traditional hand tools, intricate patterns and fine lettering become effortless.
In essence, using a laser engraver on wood bridges the gap between craftsmanship and technology, offering an elegant solution for those who appreciate both artistry and efficiency. It’s a tool that turns simple timber into a statement piece, elevating your creative process with laser-like precision.
Types of Laser Engravers Suitable for Wood
When contemplating the artistry of using a laser engraver on wood, understanding the variety of wood types available becomes paramount. Each grain, texture, and composition whispers a different story, demanding a tailored touch. In South Africa, artisans often work with indigenous woods like Kiaat and Wattle, whose rich hues and intricate grains lend a regal backdrop to laser-etched designs. The secret lies in selecting the right type of wood to elevate the final masterpiece, transforming simple timber into a canvas of endless possibility.
Choosing the appropriate wood not only influences the aesthetic outcome but also the engraving process itself. Softer woods such as pine and balsa allow for rapid, detailed work, while hardwoods like oak and mahogany demand finesse and patience. For those venturing into using a laser engraver on wood, understanding these nuances unlocks a world of creative potential. The right choice enhances clarity and depth, ensuring each engraved line captures the essence of craftsmanship—delivering results that resonate with both tradition and innovation.
How Laser Engraving Works on Wood
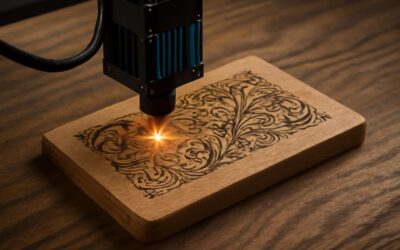
Laser engraving on wood is a delicate dance between technology and artistry, where precision meets creativity. When you use a laser engraver on wood, a focused beam of light meticulously removes or etches the surface, revealing intricate patterns, text, or images. This process transforms ordinary timber into a personalized masterpiece, capturing the essence of craftsmanship and innovation.
The magic lies in the way the laser interacts with the wood’s grain and texture. Soft woods like pine or Wattle respond swiftly, allowing for detailed, rapid engraving, while harder varieties such as Kiaat demand a gentle touch and patience. This nuanced process ensures that each line and shade is crafted with intent, enhancing depth and clarity in every piece.
Understanding how laser engraving works on wood reveals that it’s not merely about cutting or etching but about harnessing light’s energy to create art. The laser’s heat causes localized combustion, vaporizing or charring the surface, which results in a permanent mark. Whether producing a subtle engraving or a bold design, the key is in adjusting parameters like power, speed, and frequency to suit the specific wood type. This careful calibration ensures that each project using a laser engraver on wood resonates with both technical mastery and artistic soul.
Benefits of Using a Laser Engraver on Wood
Using a laser engraver on wood unlocks a world of creative possibilities. The precision and detail achievable with modern laser technology mean that even the most intricate designs can be brought to life on timber surfaces. This method offers a level of accuracy that manual tools simply cannot match, making it ideal for professional craftsmanship and personalized projects alike. Laser engraving also provides a clean, permanent mark that withstands the test of time, perfect for souvenirs, signage, or bespoke gifts.
One of the key benefits of using a laser engraver on wood is the versatility it offers. Soft woods like pine respond quickly, allowing for rapid production, while harder woods like Kiaat can be engraved with fine detail—though it may require adjusting settings for optimal results. This adaptability makes laser engraving suitable for a wide range of applications, from detailed artwork to bold branding.
- Enhanced precision and detail
- Permanent, high-quality markings
- Efficiency in producing complex designs
- Ability to work on various wood types
In South Africa, where craftsmanship and unique design are highly valued, using a laser engraver on wood can elevate your work to new heights. It’s a tool that combines technical mastery with artistic expression, delivering stunning results every time. Whether for small-scale artisan projects or larger commercial production, laser engraving remains a game-changer in the world of woodworking and design innovation.
Choosing the Right Laser Engraver for Woodworking
Key Features to Consider
Choosing the right laser engraver for woodworking isn’t just about splurging on the priciest model; it’s about matching features to your creative ambitions and practical needs. When exploring how to optimize your workshop, consider the engraver’s power, precision, and size. A higher wattage might sound impressive, but if you’re only dabbling in delicate designs, it might be overkill — or a costly mistake.
For those venturing into using a laser engraver on wood, a key feature is a stable and user-friendly interface. After all, a complicated control panel can turn your DIY project into a frustrating ordeal faster than you can say “burnt edges.” You’ll also want a work area that accommodates the size of your projects, whether you’re crafting intricate jewelry or large signage.
Here are some features to keep an eye on:
- Adjustable laser power for different wood types
- High resolution for detailed engraving
- Safety features like exhaust systems and emergency stops
- Compatibility with design software — because nobody wants to draw with a mouse the size of a cricket ball
In the end, choosing the ideal laser engraver for your woodworking adventures means balancing technical specs with your creative goals. After all, the right machine can turn a simple piece of wood into a masterpiece—without turning your workshop into a smoky chaos.
Power and Wattage
When it comes to choosing a laser engraver for woodworking, power is the name of the game — or is it? A common misconception is that more wattage automatically equals better results. In reality, the key is matching the laser’s wattage to your specific projects. For delicate engravings on fine wood species, a lower wattage (around 30-50W) can provide precision without turning your masterpiece into a charred relic. But if you’re planning to cut through thicker timber or produce bold signage, a higher wattage (60W and above) might be your best friend.
Understanding the right balance prevents you from over-investing in unnecessary power. Think of it this way: using a laser engraver on wood with too much wattage on small, detailed projects is like bringing a sledgehammer to a needlepoint — overkill and potential destruction. Conversely, too little power can leave your designs looking washed out, requiring multiple passes and risking uneven results. Many professionals recommend
- considering the type of wood
- the intricacy of designs
- desired cutting depth
before settling on the perfect wattage. This way, your workshop stays efficient, and your wooden creations come out pristine and professional every time.”
Work Area Size
Choosing the right laser engraver for your woodworking sanctuary is akin to selecting the perfect brush for a masterpiece—size matters! The work area size determines how ambitious your projects can be. A compact, smaller bed might be ideal for intricate jewelry or delicate ornaments, where precision reigns supreme. Larger work areas, however, open the door to bold signage, expansive art panels, or custom furniture details. It’s an enchanting dance between your creative vision and the spatial boundaries of your workshop.
When considering your ideal setup, think about the scope of your projects. Do you envision carving elaborate patterns into small wooden keepsakes or crafting sprawling wooden murals? Your answer guides the choice. For those venturing into using a laser engraver on wood for diverse projects, a versatile size can boost efficiency and unlock new realms of artistic possibility. Balancing the work area size with your available space ensures your laser becomes a trusted partner in transforming raw timber into timeless art.
Precision and Resolution
Precision and resolution are the heartbeat of successful projects when using a laser engraver on wood. A machine with high resolution ensures your intricate designs are crisp and detailed, transforming simple timber into stunning works of art. In the realm of woodworking, clarity can make or break a piece—especially when delicate patterns or fine lettering are involved.
Look for a laser engraver that offers adjustable resolution settings. This flexibility allows you to balance speed and detail according to each project’s demands. For those venturing into complex carvings or personalized gifts, a higher resolution engraver becomes an invaluable tool. Remember, a laser with superior resolution delivers sharper edges and smoother curves, elevating your craftsmanship from good to exceptional.
Ultimately, choosing the right laser engraver on wood hinges on understanding the importance of resolution. A machine that combines precision with reliable performance is your gateway to unlocking the full potential of your creative vision. When used correctly, the right setup ensures your artwork is not just engraved but truly alive—embodying the essence of your craftsmanship.
Compatibility with Different Types of Wood
Choosing the right laser engraver for woodworking is akin to selecting a trusted steed for a grand quest—each type must harmonize with the unique qualities of the wood it will tame. Different woods possess distinct textures, densities, and grain patterns, making compatibility an essential factor in achieving mastery with your laser engraver. For instance, hardwoods like oak or mahogany demand a machine with higher precision and power, ensuring the intricate details emerge without burning or blurring.
Softwoods such as pine or cedar, while more forgiving, still require careful calibration to prevent over-engraving. Some laser engravers are specially designed with adjustable settings to accommodate this variety seamlessly, turning each piece of timber into a canvas of artistry. To navigate this, consider a laser engraver that offers versatile compatibility, allowing you to explore a spectrum of wood types without compromise. This flexibility not only elevates your craft but opens a portal to endless creative possibilities—making every project a legendary tale of craftsmanship.
Preparing Wood for Laser Engraving
Selecting the Right Type of Wood
When it comes to using a laser engraver on wood, preparation is paramount. Not all types of wood respond equally to laser etching; selecting the right kind can make or break your project. Dense hardwoods like oak and maple offer crisp, detailed engravings, while softer woods such as pine or cedar tend to produce a more rustic, textured finish. The key is understanding the grain and density of your chosen wood, as these factors influence the engraving quality and durability.
Before you start, ensure your wood is free of dust, oils, and moisture. Any impurities can cause uneven burns or blurry lines, diminishing the precision of your work. A light sanding followed by a gentle wipe with a lint-free cloth prepares the surface for optimal results. For those aiming for intricate designs, consider selecting woods with a tight, even grain, which provides a stable base for high-resolution laser engraving.
- Use kiln-dried wood to minimize warping during engraving.
- Avoid woods with resin pockets or knots that can cause unpredictable burn marks.
- Opt for untreated wood to prevent smoke and residue buildup that could interfere with the laser’s focus.
Choosing the right type of wood is a decisive step in mastering the art of using a laser engraver on wood. It’s a delicate dance of science and intuition—getting it right transforms your designs from mere images into timeless art.
Surface Preparation Tips
Preparation is the unsung hero of successful laser engraving projects. When using a laser engraver on wood, surface cleanliness directly impacts the quality of your design. Dust, oils, and moisture are the enemies of precision—residues that can cause uneven burns or blurry lines. A simple routine of light sanding followed by a wipe with a lint-free cloth can dramatically improve results. This step ensures the laser interacts evenly with the wood, producing crisp, detailed engravings.
To further enhance your results, consider the type of wood you select. Kiln-dried wood is preferable as it minimizes warping during the engraving process. Additionally, avoid woods with resin pockets or knots, which can lead to unpredictable burn marks. If you aim for intricate designs, choosing wood with a tight, even grain will provide a stable surface that guarantees high-resolution laser engraving. Proper surface preparation isn’t just a step; it’s the foundation for transforming raw wood into works of art using a laser engraver on wood.
Design Considerations
Preparing your wood surface for laser engraving is akin to setting the stage for a captivating performance. When using a laser engraver on wood, the quality of your final design hinges on the meticulousness of your preparation. A pristine, smooth surface allows the laser to dance evenly across the grain, unveiling crisp lines and intricate details. Dust, oils, or moisture act as silent saboteurs, blurring the finesse of your craftsmanship. That’s why a gentle sanding, followed by a careful wipe with a lint-free cloth, transforms raw timber into a canvas worthy of artistry.
Choosing the right wood is equally vital. Opt for kiln-dried varieties with a tight, uniform grain—these woods stand resilient against the heat and won’t warp or develop unpredictable burn marks. For those aiming to push the boundaries of detail, selecting wood with minimal resin pockets and knots ensures each stroke of the laser reveals the intended pattern with clarity. Consider these factors as your secret ingredients for elevating your project when using a laser engraver on wood—turning mundane planks into masterpieces that tell stories in every burn mark.
Safety Measures
Before you embark on the mesmerizing journey of using a laser engraver on wood, safety becomes your guiding star. The dance of laser light can be enchanting, but it demands respect and precaution. Ensuring your workspace is well-ventilated is paramount, as fumes from burning wood can be both hazardous and pungent. Wearing protective eyewear isn’t just a suggestion—it’s a necessity to shield your vision from stray beams that might escape the safety shield.
Additionally, keep a fire extinguisher nearby—wood’s natural combustibility means that even the tiniest spark can ignite a blaze. Never leave your laser engraver unattended during operation; a moment’s distraction can turn a creative moment into a safety concern. Remember, meticulous care when using a laser engraver on wood not only preserves your health but also guarantees a flawless masterpiece, unmarred by mishaps or mishandling.
Steps for Laser Engraving on Wood
Design Creation and File Preparation
Embarking on the journey of using a laser engraver on wood requires meticulous planning and precision. The first step involves selecting a high-quality design that aligns with the dimensions of your work area and the engraving capabilities of your device. Once the digital design is finalized, it’s essential to prepare the file correctly—converting it to the appropriate format, such as SVG or DXF, ensures the laser engraver interprets the image accurately. Proper file preparation minimizes errors and guarantees sharp, detailed engravings that resonate with your artistic vision.
Next, consider the importance of calibration. Ensuring your laser engraver is correctly aligned with the surface of the wood can significantly impact the final product’s quality. This process might involve adjusting focus lenses or running test engravings on scrap wood to fine-tune settings. When using a laser engraver on wood, clarity in your design and precision in setup are paramount—these elements define whether your project will be a masterpiece or a frustrating endeavor.
For streamlined workflow, many artisans and professionals follow a systematic sequence:
- Design creation and file conversion
- Material selection and surface preparation
- Machine calibration and testing
- Final engraving execution
Machine Setup and Calibration
When embarking on the voyage of using a laser engraver on wood, the setup and calibration process acts as the compass guiding your craft to perfection. Precision in these initial steps unlocks the true potential of your machine, transforming raw materials into artistic marvels. Begin by ensuring your laser engraver is positioned correctly—aligning the laser head with the surface of the wood—so that sparks of creativity aren’t dimmed by technical missteps.
Next, focus on calibration. Adjust the focus lens meticulously, as this tiny adjustment can make the difference between a crisp, detailed engraving and a blurry imprint. Running a series of test engravings on scrap wood allows you to fine-tune power, speed, and focus. Many artisans find that following a systematic sequence—such as:
- Positioning the laser head
- Adjusting the focus lens
- Running test engravings
- Refining power and speed settings
ensures consistent results. When using a laser engraver on wood, this careful calibration becomes the heartbeat of your project, weaving technical mastery into every masterpiece you create—making the difference between a fleeting vision and an enduring work of art.
Engraving Parameters and Settings
When embarking on the journey of using a laser engraver on wood, understanding the optimal engraving parameters transforms raw creativity into enduring craftsmanship. The first step involves setting the right power and speed—these two elements dictate the depth and clarity of your engraving. Too much power can scorch the wood, while too little may result in a faint imprint that fades into obscurity. Balancing these variables requires patience and an instinct for precision.
Adjusting the focus and selecting appropriate engraving settings are equally critical. For detailed designs, a lower speed combined with moderate power yields crisp, intricate results. Conversely, for deeper engravings or larger areas, increasing the power while decreasing the speed ensures consistent depth without sacrificing detail. Many artisans find that experimenting with different combinations on scrap wood helps identify the perfect harmony of settings—making each project uniquely refined.
Furthermore, the choice of wood impacts the final outcome. Hardwoods like oak or maple demand different settings compared to softer woods such as pine or birch. As you fine-tune your machine, consider the grain orientation and surface smoothness, which influence how the laser light interacts with the wood surface. Mastering these engraving parameters elevates the process from mere technicality to a form of silent, deliberate expression—where every setting choice contributes to the story your wood tells.
Monitoring the Engraving Process
Monitoring the laser engraving process on wood is akin to observing a delicate dance—each movement precise, each flicker of light contributing to a masterpiece. As the laser begins to etch, it’s vital to stay vigilant, ensuring that the parameters remain steadfast and the design aligns flawlessly. The gentle hum of the machine becomes a symphony of creation, requiring the operator’s keen eye and a steady hand.
In this silent spectacle, it’s essential to watch for signs of over-penetration or uneven engraving. Adjusting the focus midway or tweaking the speed meticulously can salvage a project teetering on the edge of imperfection. Many artisans recommend a simple yet effective method:
- Observe the first few lines carefully
- Pause periodically to assess depth and clarity
- Make incremental adjustments to power or speed
to achieve that perfect balance.
Engraving on wood isn’t merely about setting parameters; it’s about nurturing a relationship with the machine. As the laser carves its story into the grain, the artisan’s role shifts into that of a vigilant guardian—monitoring each pulse, ensuring the final result sings with the harmony of intention and precision. Every moment of supervision transforms raw material into a timeless testament of craftsmanship, where the process itself becomes a dance of mastery and patience.
Finishing Touches and Cleaning
Once the delicate dance of engraving concludes, the journey shifts to perfecting the finishing touches and ensuring the wood’s pristine appearance. The magic of using a laser engraver on wood lies not only in the precision of the etching but also in the subsequent care that elevates the piece to art. A gentle sanding with fine grit paper can smooth out any minor imperfections, revealing the true depth of the engraved design. This step is essential, as it enhances the clarity and contrast of the laser marks, making the artwork stand out with luminous detail.
Next, applying a protective coating—be it a clear varnish or a wood sealant—serves as a shield against environmental wear, preserving the intricate patterns carved into the grain. When using a laser engraver on wood, it’s vital to select a finish that complements the natural beauty of the material, allowing the etched details to shine through. For a polished, professional look, some artisans prefer a wax polish or oil treatment, which enriches the wood’s hue and adds a subtle glow.
Cleaning the surface thoroughly after finishing is equally crucial. Dust and debris can obscure the fine details, diminishing the visual impact of the laser engraving. A soft, lint-free cloth gently wiped across the surface removes any residual particles, ensuring that the final piece radiates clarity and craftsmanship. Remember, in the realm of using a laser engraver on wood, every detail matters—each step from finishing to cleaning breathes life into the raw material, transforming it into a timeless masterpiece that echoes the artisan’s dedication and skill.
Design Tips and Creative Ideas for Laser Engraved Wood
Popular Design Styles
When it comes to designing with a laser engraver on wood, embracing the art of contrast can elevate your creations from simple to stunning. Play with light and shadow to highlight intricate details, giving depth and dimension that captivate the eye. Organic, flowing lines work beautifully, especially when combined with natural wood grains, creating a harmonious blend of craftsmanship and artistry.
Popular design styles for using a laser engraver on wood span from rustic and vintage to sleek modern minimalism. For a timeless feel, consider engraving botanical motifs or ornate patterns that celebrate nature’s elegance. Meanwhile, geometric shapes or abstract art lend a contemporary flair, perfect for modern decor or personalized gifts.
Creative ideas are endless—think personalized wedding signs, custom coasters, or intricate wall art. Incorporating layered engraving techniques can add texture, making each piece uniquely tactile. Whether you prefer delicate filigree or bold, statement pieces, understanding different design tips can unlock the full potential of using a laser engraver on wood to craft compelling, memorable art.
Personalized Gifts and Custom Decor
When exploring the art of using a laser engraver on wood, one of the most captivating aspects is the creative potential for personalized gifts and bespoke decor. To truly elevate your designs, consider the interplay of light and shadow—an artful contrast that adds depth and visual intrigue. Layering different engraving depths can create textured effects that invite tactile interaction, transforming flat surfaces into multi-dimensional masterpieces.
Creative ideas abound when using a laser engraver on wood. From intricate monograms on wedding keepsakes to custom coasters that serve as functional art, the possibilities are endless. Incorporating layered engraving techniques not only enhances the visual appeal but also infuses each piece with a unique character. For instance, combining delicate filigree with bold geometric shapes can produce striking contrasts that captivate viewers.
- Choose contrasting design elements—delicate details paired with bold outlines—to maximize visual impact.
- Experiment with different types of wood to see how the grain influences the overall aesthetic.
- Utilize natural wood textures as part of your design, embracing imperfections as part of the charm.
In the realm of using a laser engraver on wood for personalized gifts and decor, embracing innovative design tips can set your work apart. Whether you’re crafting a rustic wooden sign or a sleek modern wall art piece, understanding how to manipulate engraving parameters ensures each project resonates with character and precision. The key is to view each item as a canvas—where thoughtful design and skilled technique combine to produce enduring, meaningful art.
Incorporating Text and Logos
When it comes to using a laser engraver on wood, the magic lies in blending artistry with precision. Creative design tips can turn a simple piece of wood into a captivating masterpiece—one that tells a story or captures a moment forever. Incorporating text and logos with finesse requires an understanding of how to balance detail with simplicity, ensuring each element stands out without overwhelming the viewer.
To elevate your projects, consider experimenting with contrasting elements. Delicate script fonts paired with bold, geometric logos can produce striking visual harmony. For example, layering different engraving depths adds texture and depth, transforming flat surfaces into tactile works of art. Natural wood grain becomes an integral part of the design—embracing imperfections as part of the charm rather than flaws to hide.
For added impact, use contrasting design elements—such as fine lines against thick outlines—that draw the eye effortlessly. When using a laser engraver on wood, don’t shy away from exploring various engraving parameters. Adjusting power and speed settings can dramatically alter the final appearance, creating a range of effects from subtle etching to deep, bold impressions. This nuanced control allows each project to resonate with character and purpose, making every engraved piece uniquely yours.
Layered and Colorful Effects
When exploring the realm of using a laser engraver on wood, the potential for layered and colorful effects unlocks a new dimension of creativity. By harnessing the nuanced control of laser settings, artisans can craft intricate designs that seem to leap off the surface, inviting touch and admiration. The interplay of light and shadow, achieved through varying engraving depths, transforms ordinary wood into a visual symphony of texture and depth.
One of the most captivating techniques involves layering different engraving depths to produce a three-dimensional illusion. This approach adds a tactile richness that elevates simple designs into immersive experiences. For instance, combining fine, delicate linework with bold, broad contours creates a dynamic contrast that captures the eye effortlessly.
Colorful effects, although not inherent to laser engraving, can be simulated by carefully choosing the type of wood and utilizing contrasting finishes. Experimenting with different wood species—such as cherry, oak, or maple—can introduce natural hues that enhance the visual complexity of your projects.
- Use contrasting wood grains
- Alter engraving depths for shadow effects
- Combine different textures within a single piece
These subtle variations deepen the narrative behind each piece, making every engraved creation uniquely resonant. The artistry of using a laser engraver on wood lies in embracing imperfections, allowing the natural beauty of the material to enhance your design rather than detract from it. The result is a harmonious blend of craftsmanship and organic charm that leaves a lasting impression.
Troubleshooting Common Issues
Preventing Burn Marks and Over-Engraving
One of the most frustrating obstacles when using a laser engraver on wood is the appearance of burn marks or over-engraving, which can mar the delicate surface and diminish the overall quality of the design. These issues often stem from improper settings or inconsistent material quality, making troubleshooting a critical skill for any enthusiast. Recognizing the subtle signs—such as excessive charring or uneven shading—can save countless hours of rework. Sometimes, the solution lies in adjusting the laser’s power or speed; too much power and you risk over-engraving, too little and the design remains faint.
To prevent burn marks and ensure crisp, clean results, consider implementing these steps:
- Lower the laser power during the initial passes to gauge the wood’s response.
- Increase the number of passes with reduced power instead of a single high-intensity pass.
- Use masking tape or application of a light layer of wood conditioner to create a barrier that minimizes scorch marks.
Furthermore, maintaining a consistent focus and ensuring proper ventilation can significantly reduce the risk of burn marks when using a laser engraver on wood. Sometimes, small adjustments in the machine’s calibration or the engraving parameters can make a profound difference, turning a problematic project into a masterpiece of precision and artistry.
Fixing Fuzzy or Blurry Engraving
Fuzzy or blurry engravings can be frustrating when working with a laser engraver on wood. Often, this issue stems from inconsistent focus or improper calibration, causing the laser beam to scatter instead of creating crisp lines. When the engraving appears hazy or smeared, it can diminish the overall quality of your project and make even the most intricate designs seem lackluster.
One effective way to troubleshoot this problem is to carefully check the focus of the laser. Ensure the laser head is precisely aligned with the surface of the wood. Slight adjustments can make a significant difference in sharpness. Additionally, consider reviewing the resolution settings—higher DPI (dots per inch) often results in cleaner, more detailed engravings.
- Verify that your laser’s lens is clean and free from dust or smudges, as debris can distort the beam.
- Adjust the engraving speed—slower speeds can improve detail but may increase the risk of burn marks if not balanced with power settings.
- Experiment with the power output; sometimes reducing the wattage slightly can sharpen the image without sacrificing depth.
Maintaining proper ventilation and ensuring the wood surface is smooth and free from splinters or dirt also contribute to a clearer, more precise result when using a laser engraver on wood. Small calibration tweaks and patience often turn a fuzzy image into a work of art, highlighting the true beauty of your handcrafted pieces.
Handling Warping or Melting
Warping and melting are the nemeses of every wood enthusiast wielding a laser engraver. If your project looks more like a melted candle than a refined gift, don’t despair—this is a common hiccup when using a laser engraver on wood. The culprit? Excess heat. Wood is an organic material, after all, and too much laser power or prolonged exposure can cause warping or even a smoky, melted mess.
To troubleshoot, start by adjusting your engraving parameters. Reducing the laser’s power output and increasing the speed often prevents the surface from overheating. Think of it as giving your wood a quick, gentle kiss rather than a fiery embrace. Also, consider the type of wood; softer varieties are more prone to warping and melting, so selecting dense, stable wood can make a notable difference.
Proper ventilation is crucial. Ensuring your workspace has good airflow minimizes heat buildup, which in turn reduces the risk of warping or melting. For added precision, you might want to implement a cooling period between passes—your wood will thank you for the break! Remember, patience and a gentle touch are your best allies when using a laser engraver on wood.
Ensuring Consistent Results
Consistency in laser engraving on wood is the silent symphony every craftsman yearns to master. The challenge lies not only in achieving precision but also in maintaining uniform results across multiple projects. Variations in wood density, humidity, or even subtle shifts in machine calibration can turn an otherwise flawless design into a blurry mirage. To combat this, meticulous attention to detail is essential during the entire process of using a laser engraver on wood. Ensuring your settings remain unchanged between engravings helps preserve the integrity of your work, while regular calibration checks prevent drift that could distort your images.
Furthermore, controlling the environment plays a pivotal role. Fluctuations in temperature or airflow can cause inconsistencies, so workspace stability is a factor often underestimated. Implementing a simple yet effective step—such as running test engravings on scrap pieces—can reveal subtle issues before they mar your final product. This proactive approach ensures each piece reflects the high standards expected from professional use of a laser engraver on wood. After all, mastery isn’t just about the initial design but about the unwavering quality that transforms basic materials into works of art.
Maintenance and Safety of Laser Engraving Equipment
Regular Maintenance Procedures
In the intricate dance between craftsmanship and machinery, maintaining a laser engraver on wood becomes an act of devotion and precision. Regular maintenance isn’t just a chore; it is the heartbeat that sustains optimal performance and safety. Every session of using a laser engraver on wood leaves microscopic traces—residue, dust, and subtle wear—each demanding vigilant attention to prevent degradation of the device’s core components. An overlooked filter or a misaligned lens can compromise the quality of your work and pose safety risks. As the adage goes, “a well-oiled machine runs smoother,” and this rings especially true when handling delicate processes like laser engraving.
Establishing a regimented maintenance routine involves several key procedures. First, routinely inspect and clean the laser lens and mirrors to ensure unobstructed light paths. Secondly, keeping the ventilation system in pristine condition is vital to expel fumes and debris generated from working with wood. For those committed to excellence, a simple checklist can be invaluable:
- Checking and replacing worn filters
- Cleaning the laser head and work area
- Calibrating the focus and alignment regularly
- Lubricating moving parts for smooth operation
Adhering to these steps not only prolongs the lifespan of your equipment but also guarantees consistent, high-quality results in every project. In the realm of using a laser engraver on wood, safety becomes an intertwined necessity—protective eyewear, proper ventilation, and adherence to manufacturer guidelines form the foundation of responsible craftsmanship. When you respect these protocols, you forge a safer environment where artistry and technology coalesce seamlessly, elevating your mastery in laser engraving to new heights.
Cleaning the Laser Optics
When it comes to using a laser engraver on wood, maintaining the laser optics is crucial for preserving both the quality of your engravings and the safety of your workspace. Dust, residue, and tiny wood particles can settle on the laser lens and mirrors, diminishing the precision of the beam and potentially causing damage over time. Regular cleaning of these components is a simple yet essential part of your maintenance routine.
To keep your laser optics in top shape, always start by turning off and unplugging the machine. Carefully remove the lens and mirrors, then clean them with a lint-free cloth and a cleaning solution specifically designed for laser equipment. Avoid abrasive materials which can scratch and impair performance. For added protection, consider using a protective cover over the laser head when not in use to prevent dust accumulation.
Incorporating an ordered maintenance schedule can make a significant difference:
- Check and clean the laser lens and mirrors weekly
- Replace worn or damaged filters promptly
- Ensure the ventilation system is free of debris and functioning properly
By adhering to these practices, you ensure consistent, high-quality results when using a laser engraver on wood. The integrity of your equipment directly influences the safety and precision of each project, making routine cleaning and inspection an unmissable aspect of responsible craftsmanship. Properly maintained laser optics are not just about output; they are about safeguarding your investment and fostering a safer working environment in your workshop.
Safety Precautions During Operation
Operating a laser engraver on wood is a delicate dance of precision and safety—one that demands your full attention. While the allure of creating stunning, personalized designs is undeniable, neglecting safety precautions can turn your workshop into a hazardous zone faster than you can say “burned timber.” Ensuring you follow essential safety measures during operation is vital for both your well-being and the longevity of your equipment.
First, always wear appropriate eye protection—laser light isn’t just bright; it’s potentially damaging. Keep your workspace well-ventilated to avoid inhaling tiny wood particles or fumes, which can be more toxic than you’d think. To prevent mishaps, never leave a laser engraver on and unattended; a moment of distraction could lead to over-engraving or, worse, a fire. Remember, using a laser engraver on wood releases heat and fumes, so having a fire extinguisher nearby isn’t just a good idea—it’s essential.
For added safety, consider implementing a simple
- safety checklist
before each session, ensuring the laser’s protective covers are in place, and all settings are correctly calibrated. Regularly inspecting the machine for worn components or loose wiring can prevent accidents before they happen. After all, a well-maintained laser engraver on wood isn’t just about quality output; it’s about safeguarding your workshop and your sanity. Safety isn’t just a precaution—it’s the foundation of responsible craftsmanship in the world of laser engraving.
Storing the Equipment Properly
Keeping your laser engraver on wood in tip-top shape isn’t just about ensuring perfect engravings; it’s also about safeguarding your workshop and your sanity. Regular maintenance might sound like a chore, but neglecting it can lead to costly repairs or, worse, dangerous malfunctions. Think of your laser engraver as a fine-tuned instrument—when it’s running smoothly, the results are exquisite; when it’s neglected, chaos ensues.
Storing the equipment properly is equally crucial. A cluttered workspace invites accidents and dust build-up, which can impair the laser’s performance. Always store your laser engraver in a dry, dust-free environment, and cover it with a protective cloth if it’s not in use for extended periods. This simple step preserves the delicate optics and prevents debris from scratching the laser’s lens. Proper storage also extends the life of your equipment, saving you from frequent replacements and headaches down the line.
To keep everything running seamlessly, consider implementing a routine inspection schedule. Check for loose wiring, worn belts, or any signs of wear and tear. If you notice something amiss, address it promptly—think of it as giving your laser engraver a health check-up. Regular cleaning of the laser optics and vents ensures optimal performance, especially when using a laser engraver on wood, where fine dust and fumes can quickly clog up sensitive parts. Remember, a well-maintained machine isn’t just about safety; it’s about consistent, high-quality output every time you embark on your creative projects.
Legal and Environmental Considerations
Fumes and Ventilation
When using a laser engraver on wood, understanding legal and environmental considerations is crucial for safe and responsible operation. Fumes generated during laser engraving can contain harmful particles that pose health risks if not properly managed. Adequate ventilation is essential to prevent the buildup of these fumes, especially in enclosed spaces. In some cases, local regulations may require certified exhaust systems to mitigate environmental impact.
Environmental concerns extend beyond fumes. The emission of volatile organic compounds (VOCs) from certain types of wood can contribute to air pollution. Implementing filtration systems or using eco-friendly wood options can greatly reduce this impact. Additionally, adhering to safety regulations helps avoid legal repercussions and ensures a safer workspace.
For those frequently using a laser engraver on wood, it’s wise to incorporate a combination of extraction fans, air purifiers, and proper workspace layout. This proactive approach not only protects health and the environment but also maintains the quality of your engravings and the longevity of your equipment.
Material Safety Data
When it comes to using a laser engraver on wood, understanding legal and environmental considerations is paramount. The fumes produced during laser engraving can contain tiny particles that pose health risks if inhaled over time. Ensuring proper ventilation—such as exhaust systems or air purifiers—can make all the difference in creating a safe workspace. In South Africa, local regulations may also require certified exhaust systems to mitigate environmental impact, especially in enclosed areas.
Beyond fumes, emissions of volatile organic compounds (VOCs) from certain woods can contribute to air pollution. To reduce this, many artisans opt for eco-friendly wood options or install filtration systems that capture harmful particles before they escape into the environment. A responsible approach to using a laser engraver on wood not only safeguards health but also aligns with growing environmental awareness.
Material Safety Data Sheets (MSDS) for different wood types offer vital insights into potential hazards and recommended safety measures. Incorporating this knowledge ensures compliance with safety regulations and promotes a sustainable workflow. A combination of extraction fans, workspace layout, and protective gear creates a safer environment, allowing artists and craftsmen to focus on their craft without worry. In the end, responsible use of a laser engraver on wood harmonizes craftsmanship with respect for both people and planet.
Compliance with Local Regulations
In the symphony of craftsmanship, the harmonization of artistry and responsibility becomes paramount when using a laser engraver on wood. South African artisans must navigate a landscape where legal and environmental considerations are not mere guidelines but vital pillars of sustainable creation. Laws surrounding ventilation and emissions safeguards are designed to protect both the creator and the environment, ensuring that every stroke of the laser does not leave a destructive echo in the air.
Compliance with local regulations, such as installing certified exhaust systems, becomes a silent guardian of this delicate balance. These systems are essential in enclosed workshops, where fumes and volatile organic compounds (VOCs) could otherwise accumulate, threatening health and polluting the air. An ordered workspace, coupled with proper filtration, transforms a workshop into a sanctuary of responsible artistry.
- Adherence to South African environmental laws
- Installation of certified exhaust systems
- Use of eco-friendly woods to mitigate VOC emissions
By respecting these legal and environmental frameworks, creators not only uphold safety standards but also forge a path toward sustainable innovation. The act of using a laser engraver on wood, therefore, becomes a gesture of harmony—an elegant dance between human ingenuity and Mother Nature’s gentle stewardship. In this dance, every piece crafted is a testament to mindful mastery, echoing a commitment to a greener, safer future.
Resources and Additional Learning
Recommended Software for Design
Embarking on the journey of mastering **using a laser engraver on wood** is akin to unlocking a treasure chest of creative possibilities. To truly excel, one must harness not just the machine, but also a curated collection of resources and learning tools that elevate craftsmanship to an art form. The digital age offers an array of software that transforms imaginative sketches into intricate, precise engravings, making the process both accessible and exhilarating.
For those eager to deepen their knowledge, exploring dedicated design software like Adobe Illustrator or CorelDRAW can be a game-changer. These tools enable detailed vector creations and meticulous adjustments, ensuring every detail is captured perfectly. Additionally, online forums and community groups dedicated to laser engraving often serve as invaluable repositories of tips, troubleshooting advice, and innovative techniques. Engaging with these communities can reveal hidden tricks and inspire new design ideas that push the boundaries of what’s possible with **using a laser engraver on wood**.
To further enrich your skills, consider investing in tutorials or online courses tailored specifically to laser engraving techniques. Such resources not only demystify complex settings but also introduce advanced concepts like optimal engraving speed, power adjustments, and material-specific strategies. When paired with recommended software for design and an understanding of the essential tools, these learning avenues ensure your projects are both precise and breathtaking—truly elevating the art of **using a laser engraver on wood** to new heights.
Online Tutorials and Communities
Expanding your knowledge of resources and online communities can significantly enhance your skills in using a laser engraver on wood. Digital platforms are treasure troves of tutorials, tips, and troubleshooting advice that help craft detailed and precise engravings. Whether you’re a beginner or an experienced user, engaging with these groups can open doors to innovative techniques and shortcuts you might not discover alone.
Online tutorials tailored specifically to laser engraving techniques are invaluable. They often include step-by-step guides on adjusting engraving speed, power, and material settings—crucial factors when using a laser engraver on wood. Many platforms also host webinars or courses that delve into advanced design creation and file preparation, sharpening your overall craftsmanship. For example, dedicated forums allow members to share their projects, offer feedback, and troubleshoot common issues in real-time.
To deepen your understanding, consider exploring reputable communities such as Laser Engraving South Africa or global forums like Laser Engraving World. These platforms frequently feature user galleries, expert advice, and discussions on the latest software updates and hardware innovations.
- Join Facebook groups focused on laser engraving projects
- Participate in online workshops or masterclasses
- Access downloadable resources and project templates
These resources can transform your approach to using a laser engraver on wood, making each project more polished and professional.
Brands and Suppliers for Laser Engraving Machines
For those venturing into the world of using a laser engraver on wood, accessing reliable resources and trusted brands can make all the difference. Reputable suppliers offer not only quality laser engravers but also comprehensive support, essential for achieving professional results. These brands often provide a robust ecosystem of tools, accessories, and software, ensuring your creative process remains seamless and efficient.
Additionally, expanding your knowledge through dedicated educational platforms is invaluable. Online tutorials and courses from established providers can deepen your understanding of optimal engraving settings, material compatibility, and troubleshooting techniques. Engaging with these sources helps avoid common pitfalls and unlocks advanced design capabilities. Whether you’re refining your craftsmanship or exploring new artistic horizons, reputable brands and learning resources form the backbone of a successful journey in using a laser engraver on wood.
- Laser Engraving South Africa
- Global suppliers like Glowforge or Epilog Laser
- Design software providers such as CorelDRAW or LightBurn
- Specialist distributors offering consumables and replacement parts
0 Comments