Understanding Laser Engraver Modules
Types of Laser Engraver Modules – CO2 Laser Modules, Fiber Laser Modules, Metal Laser Modules, Diode Laser Modules
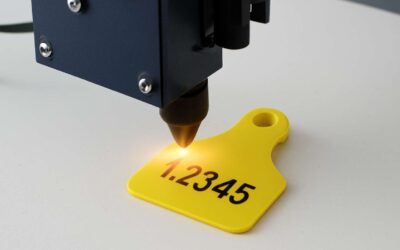
Laser engraver modules are not a one-size-fits-all solution; their varied types open doors to limitless creative possibilities. Each type is tailored to specific materials, precision levels, and applications, making the choice crucial for optimum results. Among them, CO2 laser modules dominate industries like engraving glass, wood, and acrylic, using a gas-based laser technology that offers high power and cutting accuracy.
In contrast, fiber laser modules excel at marking metals with speed and durability. Their solid-state design produces a concentrated laser beam, ideal for automotive parts, jewelry, and industrial components—delivering remarkable precision with minimal maintenance. Then there are metal laser modules, specifically engineered to work on various metal surfaces, providing a perfect solution for custom metal art and industrial part marking. Lastly, diode laser modules offer compact, cost-effective options suitable for small-scale projects, such as personalized gifts or signage.
- CO2 laser modules are versatile for non-metals like wood and acrylic.
- Fiber laser modules distinguish themselves with superior metal marking capabilities.
- Metal laser modules are tailored for industrial-grade metal engraving.
- Diode laser modules are portable and perfect for hobbyists and small businesses.
Key Components and Features – Laser Source, Control Panel, Cooling System, Focusing Lens, Engraving Surface
Understanding the core components of a laser engraver module is essential for anyone venturing into the world of precision engraving. At the heart of every reliable laser engraver module lies the laser source, the element responsible for generating the powerful beam that etches, cuts, or marks materials with remarkable accuracy. The quality of this component directly impacts the depth and clarity of the engraving. Alongside the laser source, a well-designed control panel acts as the user’s command center, allowing for intuitive adjustments to speed, intensity, and pattern selection. This is especially vital when working with diverse materials like glass, wood, or metal.
Another critical feature is the cooling system, which prevents the laser source from overheating during extended operations. Devices equipped with efficient cooling—whether water-based or air-cooled—ensure optimal performance and longevity. The focusing lens is equally indispensable; it concentrates the laser beam to a fine point, crucial for detailed work. For versatility, many laser engraver modules also incorporate an adjustable engraving surface that accommodates various sizes and textures, enhancing their adaptability across different projects.
- Laser source
- Control panel
- Cooling system
- Focusing lens
- Adjustable engraving surface
Applications and Uses – Personalized Gifts, Industrial Marking, Artistic Creations, Educational Projects
The realm of laser engraver modules is a tapestry woven with endless possibilities, each stroke of the laser transforming raw materials into cherished keepsakes or industrial marvels. For craft enthusiasts and entrepreneurs alike, understanding the applications and uses of a laser engraver module opens doors to a universe of creativity and precision. It’s not merely about etching patterns; it’s about unleashing a symphony of artistry, innovation, and functionality.
From personalized gifts that evoke heartfelt emotion to intricate artistic creations that challenge traditional boundaries, the laser engraver module is an unwavering tool in modern design. In industry, it accelerates marking processes on metals, plastics, and ceramics, offering a level of accuracy that manual engraving simply cannot match. Educational projects flourish with laser technology, serving as gateways to STEM learning and hands-on experimentation.
Whether you’re designing a custom nameplate or engraving complex logos, the laser engraver module’s versatility is unmatched. Its ability to adapt to various surfaces and materials makes it an essential component for those who see potential in every surface—be it glass, wood, or metal. This device’s magic lies in its precision, power, and the seamless integration of laser technology into everyday applications.
Choosing the Right Laser Engraver Module
Factors to Consider – Power Output, Resolution, Material Compatibility, Size and Portability
Choosing the right laser engraver module can feel like navigating a labyrinth of technical jargon and elusive specifications. Yet, hidden within these complexities lies an undeniable truth: the perfect module aligns seamlessly with your creative or industrial vision.
Power output remains pivotal; a high-powered laser enhances speed and depth, essential for durable engravings on tough materials. But more power isn’t always better—it must be balanced with resolution. Higher resolution ensures crisp, detailed work, vital for intricate designs that demand precision. Material compatibility also plays a crucial role. Certain laser engraver modules excel with specific substrates, whether wood, acrylic, or metal, tailoring your machine’s versatility to your needs.
Physical size and portability influence both workspace and mobility, especially in environments where flexibility is paramount. Remember, sometimes a compact laser engraver module can unlock new creative horizons when space is limited. In the end, selecting the right module isn’t just about specifications—it’s about understanding the nuanced relationship between these factors to unlock your true potential.
Compatibility with CNC Machines and Platforms – Integration Tips, Firmware Compatibility, Software Requirements
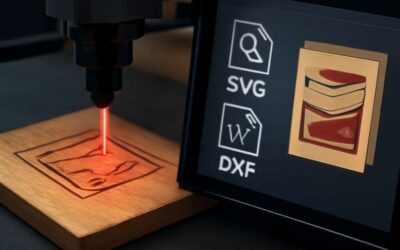
When it comes to integrating a laser engraver module into your setup, compatibility isn’t just a technical detail – it’s the cornerstone of seamless operation. Surprisingly, many overlook this step and end up wrestling with software glitches or firmware nightmares. The key lies in ensuring your chosen laser engraver module meshes effortlessly with your CNC machine or platform. Compatibility isn’t just about fitting parts together; it’s about a harmonious dance between hardware and software that produces flawless engravings every time.
Integration tips are often buried in obscure manuals or tech forums, so it’s worth noting a few essentials: firmware compatibility, software requirements, and communication protocols. Your laser engraver module should speak the same language as your CNC control system. Some modules require specific firmware updates or custom drivers—think of it as teaching two incompatible musical instruments to play in harmony. For a smoother experience, opt for laser engraver modules with broad software compatibility, or those specifically designed for popular CNC platforms.
In our experience, a simple
- checking connector types,
- matching communication standards,
and verifying software support can save days of frustration. Remember, a well-matched laser engraver module isn’t just about power or resolution — it’s about creating a symphony of precision, compatibility, and ease of use that keeps your projects moving without pause.
Cost and Budget Considerations – Budget Options, Long-term Investment, Cost-effective Brands
Choosing the right laser engraver module doesn’t have to break the bank, but it’s hardly a walk in the park either. With a spectrum of options spanning from budget-friendly fillers to high-end champions, your choice hinges on balancing affordability with long-term reliability. Many newcomers stumble into the trap of opting for the cheapest laser engraver module, only to discover that it lacks durability or compatibility, leading to costly frustrations down the line.
If your ambitions involve serious craftsmanship—say, custom signage or intricate artistic creations—investing in a reputable brand might be the smarter move. These brands often offer cost-effective laser engraver modules that are designed to withstand the rigors of consistent use. Think of it as buying a Swiss watch versus a knockoff—initial savings are tempting, but quality guarantees peace of mind and better results in the long run.
Remember, a well-chosen laser engraver module isn’t merely about getting the most power for your buck—it’s a long-term investment that can elevate your craft from amateurish scribbles to professional masterpieces.
Installation and Setup of Laser Engraver Modules
Step-by-Step Installation Guide – Mounting the Module, Connecting Power and Data Cables, Calibration Procedures
In the dim glow of the workshop, where shadows dance upon cold metal surfaces, the installation of a laser engraver module becomes a ritual of precision and patience. Understanding the intricate process can transform a mundane task into an act of artistic mastery. To commence, secure the laser engraver module firmly onto its designated mounting bracket, ensuring it is perfectly aligned to avoid any future distortions that may mar your craftsmanship.
Next, connect the power and data cables with deliberate care; each connection should feel like a whisper of power flowing through the veins of your device. Proper calibration is the key to unlocking the full potential of your laser engraver module, often involving reflective adjustments and test runs that reveal the true essence of your machine’s capabilities. Remember, a misaligned laser source or loose connection can turn your work into a nightmarish ordeal, so double-check each step with meticulous scrutiny.
If you prefer a structured approach, consider this step-by-step process for a seamless setup:
- Mount the laser engraver module securely, ensuring stability and alignment.
- Connect all power cables to a reliable voltage source, avoiding interruptions during operation.
- Link the data cables to your control unit, ensuring firm connections to prevent signal loss.
- Perform calibration procedures, including focusing the lens and testing engravings on scrap material.
- Adjust settings for optimal resolution and power output, tailored to your specific material.
Embarking on this journey transforms a complex device into an extension of your creative spirit—an orchestration of light and shadow, patience and precision, all woven into the dark elegance of the perfect laser engraver module.
Safety Precautions – Protective Gear, Ventilation, Safe Operating Practices
Operating a laser engraver module demands more than just technical know-how; it requires unwavering respect for safety protocols that safeguard both your equipment and your well-being. In South Africa, where workshop safety standards are evolving, understanding the importance of protective gear cannot be overstated. Wearing safety goggles specifically designed for laser protection, along with respirators in well-ventilated areas, keeps dangerous fumes and stray laser reflections at bay.
Proper ventilation is not optional—it’s essential. Laser engraving produces airborne particles and potentially harmful fumes, especially when working with plastics or treated woods. Ventilation systems must be strong enough to extract these contaminants, ensuring a healthy workspace.
- Always operate the laser engraver module in a well-ventilated environment.
Safe operating practices involve more than personal safety; they extend to machine handling. Never leave the laser engraver module unattended while in operation, and double-check connections before powering up. Using emergency stop buttons and ensuring your control panel is within easy reach are critical safety measures. Precautions like these prevent mishaps and extend the life of your machine, allowing your creativity to flow freely under a shielded, secure environment. Your workshop, after all, should be a sanctuary of precision and safety—a place where innovation thrives without compromise.
Troubleshooting Common Setup Issues – Alignment Problems, Connectivity Errors, Power Supply Concerns
Embarking on the journey with your laser engraver module is as exhilarating as it is precise, yet the initial setup phase often masks potential pitfalls. A smooth installation not only ensures flawless operation but also safeguards your investment. The first step is mounting the laser engraver module securely—use quality brackets and double-check alignment. Poor alignment can lead to uneven etching and wasted material, undermining your creative flow.
Connectivity errors can quickly mire progress if not addressed early. Verify that all data cables are correctly plugged and compatible with your control system. This is where paying attention to firmware compatibility becomes crucial; mismatched software versions may cause communication hiccups, frustrating even the most seasoned operators. Power supply concerns are equally vital—ensure your laser engraver module receives stable voltage to prevent sudden shutdowns or damage. Always use a dedicated circuit and consider surge protectors as a safeguard against power fluctuations common in South Africa’s inconsistent electrical landscape.
- Carefully calibrate the laser focus to achieve optimal engraving clarity.
- Perform test runs to identify misalignments or inconsistencies in the engraving pattern.
- Inspect connections regularly to maintain seamless communication between the control panel and laser engraver module.
Remaining vigilant during installation cultivates a foundation where your laser engraver module can operate at its full potential, transforming ideas into works of art with unmatched precision and reliability. It is as much about respecting the technology as it is about nurturing your own craft—a dance of mastery that begins with flawless setup.
Optimizing Performance and Maintenance
Enhancing Engraving Quality – Focus Adjustment, Speed and Power Settings, Material Preparation
In the shadowy realm of laser craftsmanship, the true alchemy resides in the meticulous tuning of your laser engraver module. Precision is not an accident—it is an art forged through focus adjustment, where the beam’s clarity pierces the darkness with unwavering intent. By tightening the focus, every engraving becomes a whisper of poetry carved into the surface, revealing intricate details that breathe life into mundane materials.
Adjusting speed and power settings further enhances engraving quality—too fast, and the magic is lost; too slow, and the essence burns away. A delicate balance ensures each stroke aligns with your vision. Material preparation, often overlooked, is crucial; cleaning and selecting the right substrate give the laser engraver module the foundation it craves to perform at its best.
Seek harmony in your setup, for in this dance of variables lies the secret to unlocking the deeper shadows of the craft.
Routine Maintenance – Lens Cleaning, Cooling System Checks, Software Updates
In the shadowed corridors of the forge, where mastery meets meticulous care, the performance of your laser engraver module hinges on vigilant ritual. Regular maintenance transforms a capricious device into an instrument of alchemical precision. Lens cleaning, often seen as a mundane ritual, is a sacred act—removing dust and residue ensures the laser beam remains sharp and focused, piercing the darkness with unwavering clarity. Neglect this, and the shadows will distort your artistry, blurring fine details into ghostly smudges.
Cooling system checks are equally vital; without proper oversight, the heat builds like a brewing storm, threatening to unravel the delicate balance inside the module. Over time, software updates become the arcane scrolls that unlock hidden potentials—bolstering performance and patching the vulnerabilities that time unveils.
To sustain the vigor of your laser engraver module, consider implementing a simple yet vital routine. Here is a brief overview:
- Inspect and clean the lens thoroughly to maintain beam integrity.
- Verify the cooling system’s efficiency—uninhibited airflow can define the difference between success and failure.
- Regularly install software updates, ensuring your device remains responsive and secure from emerging digital specters.
Ritualistically tending to these elements keeps your engraver not just operational but transcendent, unlocking its true dark glory with every engraved detail.
Upgrading and Expanding Capabilities – Adding Accessories, Software Upgrades, Future-proofing Tips
Enhancing the capabilities of your laser engraver module is a game-changer for both hobbyists and professionals alike. By incorporating accessories and software upgrades, you can tailor your device to better suit specific projects and materials. For example, adding a rotary attachment expands the engraver’s ability to decorate cylindrical objects, transforming simple designs into versatile masterpieces.
Investing in quality software updates throughout the life of your laser engraver module ensures you’re not left behind as technology evolves. These updates often introduce advanced features such as improved resolution control, faster processing speeds, and enhanced safety protocols. Future-proofing your setup means considering compatibility with upcoming CNC platforms and emerging digital tools, allowing your laser engraver module to grow alongside your ambitions.
- Adding accessory modules like autofocus systems to boost precision.
- Upgrading to more powerful power supplies for enhanced material compatibility.
- Implementing advanced software solutions for intricate designs and improved workflow.
Flexibility is key in the fast-paced world of laser engraving. Thoughtful upgrades ensure your laser engraver module remains a cutting-edge instrument capable of tackling complex tasks while delivering consistent, high-quality results.


0 Comments